


What is Code-as-World?
Code-as-World is a research project for representing the physical world through executable code. Its central idea is that pixels provide evidence about a scene, but do not directly define the objects, states, structures, dynamics, or mechanisms that produced what was observed.
The project uses an agentic process based on iterative simulation and verification to discover executable world representations from observations. These representations turn visual evidence into reusable physical data and support quantitative physical reasoning.
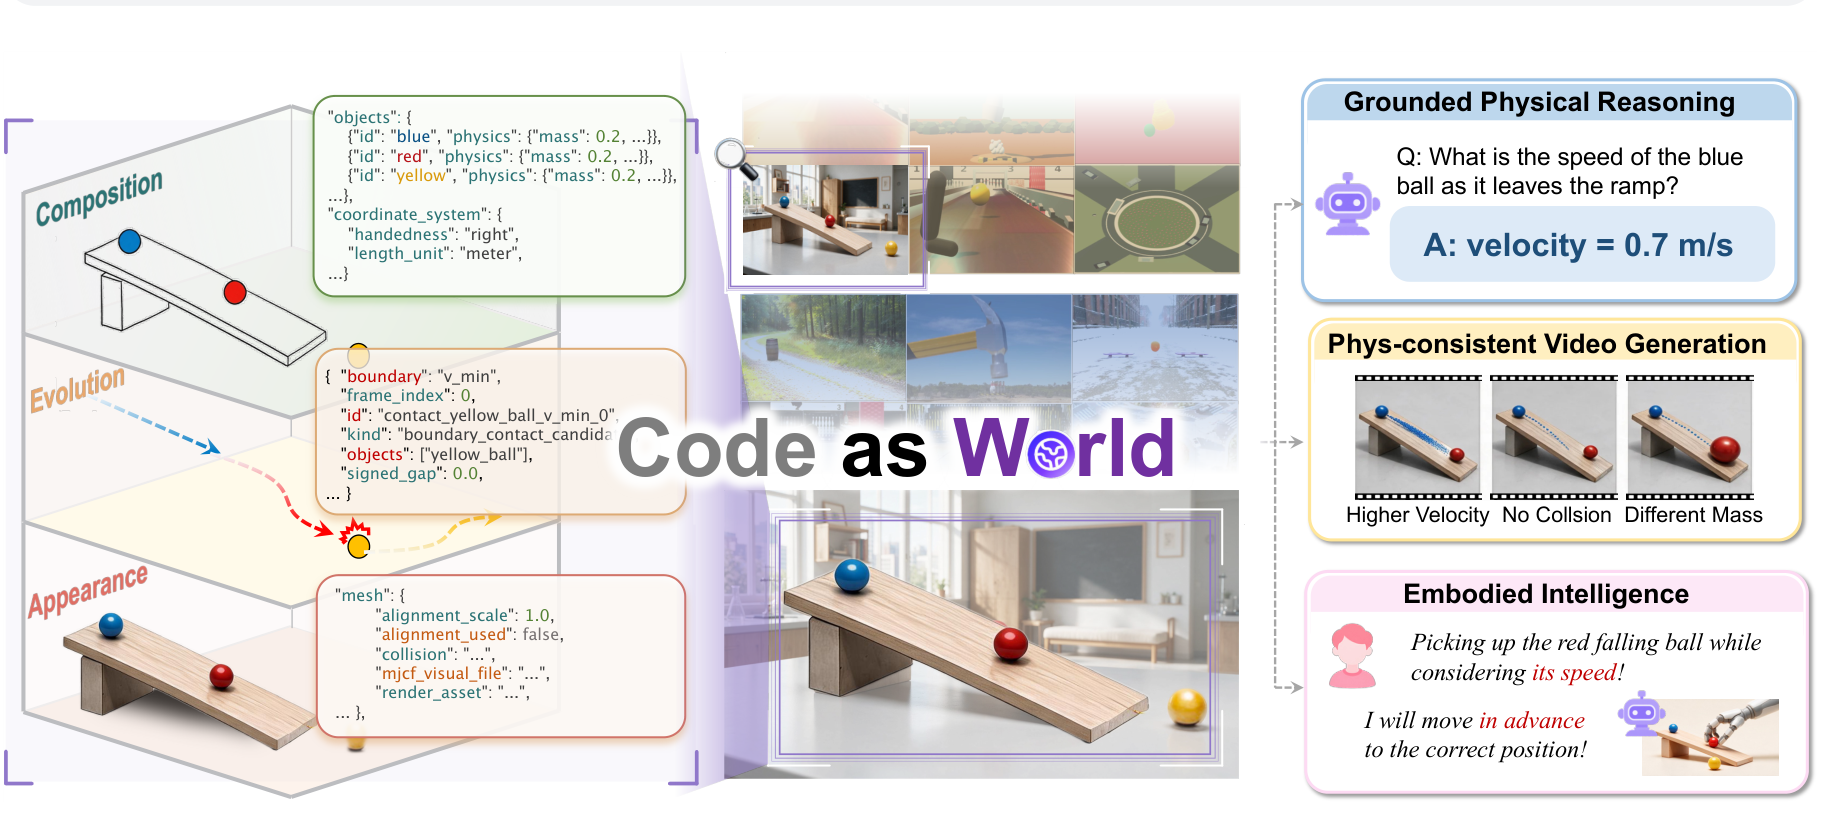
The release provides local inference and evaluation support for two vision-language checkpoints: Code-as-World-VL-4B and Code-as-World-VL-9B. It also includes OpenAI-compatible serving through vLLM and a video-driven physical abstraction example built with MuJoCo.
Key capabilities
- Executable world representations: Models physical states, dynamics, and mechanisms rather than treating pixels as the complete ontology of a scene.
- Two released checkpoints: Choose between the 4B and 9B Code-as-World-VL models.
- QuantiPhy evaluation: Run quantitative physical reasoning evaluation over validation videos and produce evaluator-compatible prediction files.
- OpenAI-compatible serving: Expose either checkpoint using the standard vLLM API server.
- Simulation example: Run a bundled ballistic soccer case and save its rendered video and trajectory.
Prerequisites
Use Python 3.10 or 3.11 on a CUDA-enabled host. You will also need Git and the Hugging Face CLI used by the hf download commands. Model storage and GPU memory requirements depend on whether you use the 4B checkpoint, the 9B checkpoint, or both.
Follow the repository commands from a CUDA environment. The README does not provide a CPU-only inference recipe.
Install Code-as-World
1. Clone the repository
git clone https://github.com/MirroS-Lab/Code-as-World.git
cd Code-as-World
2. Create and activate a virtual environment
python -m venv .venv
source .venv/bin/activate
The activation command above is intended for Unix-like shells. Once activated, install the inference dependencies supplied by the project:
pip install -r requirements/inference.txt3. Download the checkpoints
hf download MirroS-Lab/Code-as-World-VL-4B --local-dir weights/4b
hf download MirroS-Lab/Code-as-World-VL-9B --local-dir weights/9b
These commands place the 4B and 9B models in weights/4b and weights/9b. If you only intend to use one model, download only its corresponding checkpoint.
Run a QuantiPhy evaluation
QuantiPhy is the quantitative evaluation suite used by the release. Before running Code-as-World evaluation, clone QuantiPhy and download its validation videos.
1. Prepare the evaluation data
git clone https://github.com/Paulineli/QuantiPhy.git /path/to/QuantiPhy
hf download PaulineLi/QuantiPhy-validation \
  --repo-type dataset \
  --local-dir /path/to/QuantiPhy-validation
Replace /path/to/QuantiPhy and /path/to/QuantiPhy-validation with real locations on your system.
2. Evaluate the 4B model
From the Code-as-World repository, run:
python -m code_as_world.evaluation 4b \
  --input-csv /path/to/QuantiPhy/quantiphy_validation.csv \
  --video-dir /path/to/QuantiPhy-validation/validation_videos
3. Evaluate the 9B model
python -m code_as_world.evaluation 9b \
  --input-csv /path/to/QuantiPhy/quantiphy_validation.csv \
  --video-dir /path/to/QuantiPhy-validation/validation_videos
Each run writes three kinds of artifacts to outputs/quantiphy/: an evaluator-compatible prediction CSV, a metric summary for the individual run, and the model's raw generations. Keeping the raw output is useful when inspecting responses behind individual scores.
4. Run the official evaluator
After producing prediction CSV files, install pandas and invoke the official QuantiPhy evaluator:
pip install pandas
python /path/to/QuantiPhy/evaluator.py \
  outputs/quantiphy \
  outputs/quantiphy_metrics \
  --gt_file /path/to/QuantiPhy/quantiphy_validation.csv
This command evaluates the prediction files found in outputs/quantiphy against quantiphy_validation.csv and writes the resulting metrics to outputs/quantiphy_metrics.
Serve the model with vLLM
The checkpoints can be exposed through an OpenAI-compatible vLLM endpoint. The following command serves the 4B checkpoint on GPU 0:
CUDA_VISIBLE_DEVICES=0 vllm serve weights/4b \
  --served-model-name code-as-world-4b \
  --chat-template code_as_world/templates/qwen3_5_no_think.jinja \
  --chat-template-content-format openai \
  --default-chat-template-kwargs '{"enable_thinking":false}' \
  --max-model-len 4608 \
  --gpu-memory-utilization 0.90 \
  --media-io-kwargs '{"video":{"num_frames":16,"fps":-1,"video_backend":"openpangu"}}' \
  --mm-processor-kwargs '{"do_sample_frames":false}' \
  --mm-processor-cache-gb 0 \
  --generation-config vllm
The server registers the model under the name code-as-world-4b. It uses the project's no-thinking chat template, sets the maximum model length to 4608, and configures video input for 16 frames through the openpangu backend.
To serve the larger checkpoint, replace weights/4b with weights/9b and replace code-as-world-4b with code-as-world-9b.
Run the video-driven abstraction example
The repository includes a ballistic soccer example backed by MuJoCo. Install the separate simulation requirements first:
pip install -r requirements/simulation.txtThen launch the simulation:
python -m code_as_world.simulationThe simulation writes its rendered video and trajectory to outputs/simulations/.
Generate only the trajectory
If you do not need a rendered video, disable rendering:
python -m code_as_world.simulation --no-renderThis mode is useful when only trajectory data is required or when rendering would add unnecessary overhead.
Advanced usage tips
- Select the model deliberately: Use the
4bor9bevaluation argument consistently with the checkpoint you downloaded. - Download only what you need: Avoid storing both checkpoints if your workflow uses only one model size.
- Preserve raw generations: Review files in
outputs/quantiphy/when diagnosing why a prediction received a particular score. - Run both evaluation layers: The Code-as-World command creates a single-run summary, while the official QuantiPhy evaluator can evaluate the generated prediction CSV files together.
- Keep the supplied chat template: The serving recipe explicitly uses
code_as_world/templates/qwen3_5_no_think.jinjaand disables thinking. Retain these settings when reproducing the documented configuration. - Adjust GPU selection carefully: The serving example uses
CUDA_VISIBLE_DEVICES=0and a GPU memory utilization value of0.90. Choose the visible device according to your CUDA host while treating other changes as deviations from the released recipe. - Skip rendering when appropriate: Add
--no-renderto the simulation command when the trajectory is the only required output.
Further reading
For the research background and methodology, consult the technical report, the project page, and the MirroS blog post.
Conclusion
Code-as-World provides a practical release for exploring executable representations of physical scenes. After installing the inference environment and downloading a checkpoint, you can reproduce QuantiPhy evaluations, serve a model through vLLM, or run the included MuJoCo simulation. Together, these workflows demonstrate how visual observations can support explicit and verifiable physical reasoning.