

What Chat Seek does
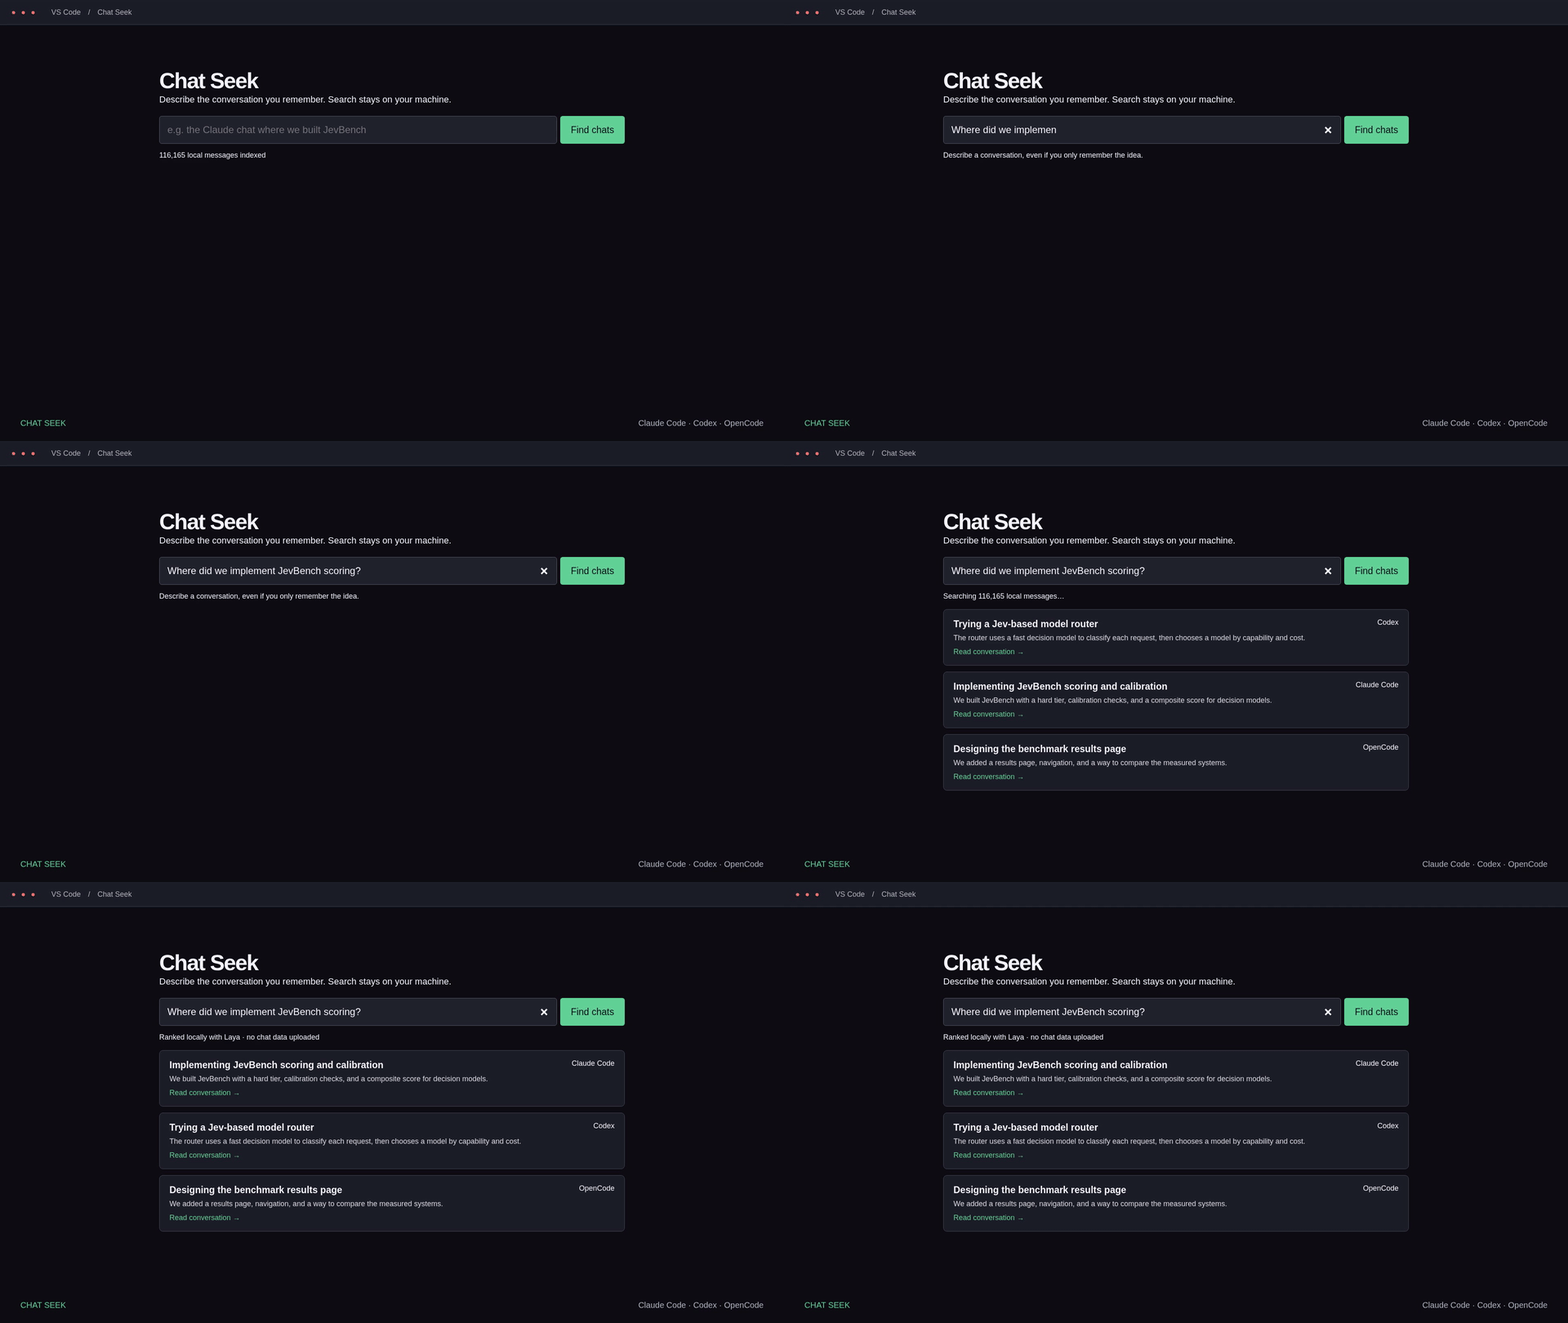
Chat Seek is a VS Code extension for finding past Claude Code, Codex, and OpenCode conversations from a plain-language description. It searches locally stored user and assistant messages, then uses the Laya local decision model to refine the order of likely matches.
Search results include a readable excerpt, the latest activity date, and optional one-sentence descriptions. When the source session is still available, the result also provides a Resume action that opens the corresponding CLI in a VS Code integrated terminal.
Supported chat histories
Chat Seek reads these default locations:
~/.claude/projectsand~/.claude/archived_projectsfor Claude Code~/.codex/sessionsand~/.codex/archived_sessionsfor Codex~/.local/share/opencode/storagefor file-based OpenCode session, message, and part storage
Only user and assistant text is indexed. Tool results and subagent transcripts are excluded. Newer OpenCode database-only storage is not currently imported. If your histories use different locations, configure them with chatSeek.extraRoots. Paths containing codex or opencode select those parsers; other paths are treated as Claude Code roots.
Install Chat Seek
Install the prebuilt VSIX
The supplied prebuilt package supports Linux x64, including VS Code Remote WSL. VS Code 1.99 or later is required.
- Download the Linux x64 VSIX from the latest release.
- Open VS Code and run Extensions: Install from VSIX... from the Command Palette.
- Select the downloaded VSIX file.
- Open the Chat Seek view after installation.
For VS Code Insiders, use the code-insiders command and the matching Insiders environment. In a remote window, install Chat Seek into the environment that contains the chat histories, not only into the local UI host.
Build and install from source
To build on Linux x64, use Node.js 20 or later, clone the repository, and run:
npm ci
npm test
npm run lint
npm run package
code --install-extension chat-seek-linux-x64-0.2.1.vsix --force
Use code-insiders instead of code when working with VS Code Insiders. Building for another platform requires changing the vsce --target argument and adjusting the .vscodeignore ONNX native-binary exclusions so the appropriate runtime is included. Do not relabel the supplied VSIX for another platform.
Open your first search
- Press Ctrl+Shift+P on Windows or Linux, or Cmd+Shift+P on macOS.
- Run Chat Seek: Search past AI chats.
- Type a description of the conversation you want to find, such as the discussion where I fixed authentication failures in the deployment script.
- Review the matching excerpts, dates, and summaries when available.
You can also click the Chat Seek magnifying-glass icon in the Activity Bar. Select Pin search tab to keep the editor search tab available. If the Activity Bar icon is hidden, right-click the Activity Bar to show it or drag the view to another sidebar location.
Opening the search refreshes the local index. Unchanged transcript files are reused, and Refresh chats updates the index while the panel is open. The first Laya use downloads approximately 1.7 GB of model weights to ~/.cache/receptron-laya and performs CPU inference. Keyword results appear first, followed by Laya's ranking refinement.
Resume a matching conversation
Use the Resume in Claude Code, Resume in Codex, or Resume in OpenCode action on a result when available. Chat Seek opens the matching CLI in a VS Code integrated terminal, using its session ID and original working directory when available.
Resume launches the CLI but does not automatically submit a new prompt. The relevant CLI must be installed and signed in in the same environment as the extension. This action opens the CLI, not a vendor's proprietary chat sidebar. Archived or moved sessions may no longer be resumable, but Read excerpt can still open the indexed context.
Configure optional AI summaries
Basic search, indexing, and Laya reranking work without an API key. Summaries are disabled by default. To enable them, click Configure summaries in Chat Seek or run Chat Seek: Configure summaries.
Add a key through the masked input, which stores it in VS Code SecretStorage, then explicitly enable summaries after reviewing the provider disclosure. Existing environment variables are supported, but simply having a key does not enable uploads. SecretStorage keys take precedence over environment keys for the same provider.
The available providers and default models are:
- OpenAI:
OPENAI_API_KEY, default modelgpt-5.6-luna - OpenRouter:
OPENROUTER_API_KEYorOPEN_ROUTER_API_KEY, default modelopenai/gpt-5.6-luna - TensorX:
TENSORX_API_KEY, default modelz-ai/glm-5.3-flash - Custom OpenAI-compatible endpoint:
CHAT_SEEK_API_KEY, with a model and base URL that you configure
In auto mode, Chat Seek tries only providers with a configured key and model, in the listed order. Missing keys are skipped, and request errors fall through to the next configured provider. Select a specific provider in settings if you want to prevent cross-provider fallback.
Use a custom provider
For another provider or a local OpenAI-compatible server, set chatSeek.summaries.provider to custom, configure chatSeek.summaries.customUrl with the compatible base URL, and set chatSeek.summaries.customModel to the exact model ID. HTTPS is required except for localhost. Add the custom key through Configure summaries or CHAT_SEEK_API_KEY.
You can override provider models with settings such as chatSeek.summaries.<provider>Model. Model availability and pricing can change, so confirm the exact model supported by your provider.
Understand summary privacy and caching
Descriptions are generated lazily for displayed results, up to 30 chats, with two requests running at a time. Each request contains at most 12 sampled messages of up to 600 characters each, distributed across the conversation. Summaries are cached locally by chat content and regenerated when indexed messages change.
When summaries are enabled, sampled excerpts are sent to the configured provider and may incur API charges. Common credential patterns and known environment secrets are redacted, but redaction cannot remove every type of sensitive information. Other private chat text may still be sent. The interface labels AI summaries and identifies their provider.
Disable summaries to keep searching entirely local. Private indexes and summary caches are stored in VS Code extension storage; do not publish them. Never place API keys in committed settings, prompts, screenshots, or the repository.
Advanced settings and limitations
Disable Laya reranking
If your machine cannot support the local model or you want to avoid downloading its weights, set chatSeek.useLaya to false. Keyword search remains available.
Add custom history roots
Use chatSeek.extraRoots for custom directories or mounted Windows paths. Ensure the path points to the correct environment and, for OpenCode, points to its storage directory.
Improve search results
The shortlist depends on word overlap. A description with no shared words may miss a conversation, so include distinctive terms, project names, error messages, or technologies from the original discussion. Long messages are clipped at 2,800 characters, while previews show nearby indexed messages.
Dates represent the latest indexed message in a conversation. Missing timestamps appear as Date unknown. Native resume availability depends on whether the source application still retains the session files.
Troubleshooting installation
- If commands or the Activity Bar icon do not appear immediately, run Developer: Reload Window.
- Verify that the extension is installed in the active standard, Insiders, WSL, SSH, or container environment.
- Check the installed extension with
code --list-extensions --show-versions, or use the corresponding Insiders or remote CLI. - If environment variables are not detected, reload or restart the relevant local or remote extension host.
- If the native runtime cannot load, report the limitation accurately and keep keyword search enabled where possible.
Conclusion
Chat Seek turns local Claude Code, Codex, and OpenCode archives into a searchable workspace inside VS Code. Install the matching package in the environment that stores your histories, open Chat Seek: Search past AI chats, and describe the conversation you need. Keep summaries disabled for fully local search, or configure a provider when the convenience of AI-generated descriptions is worth the additional privacy and API considerations.