

What is Agentbox?
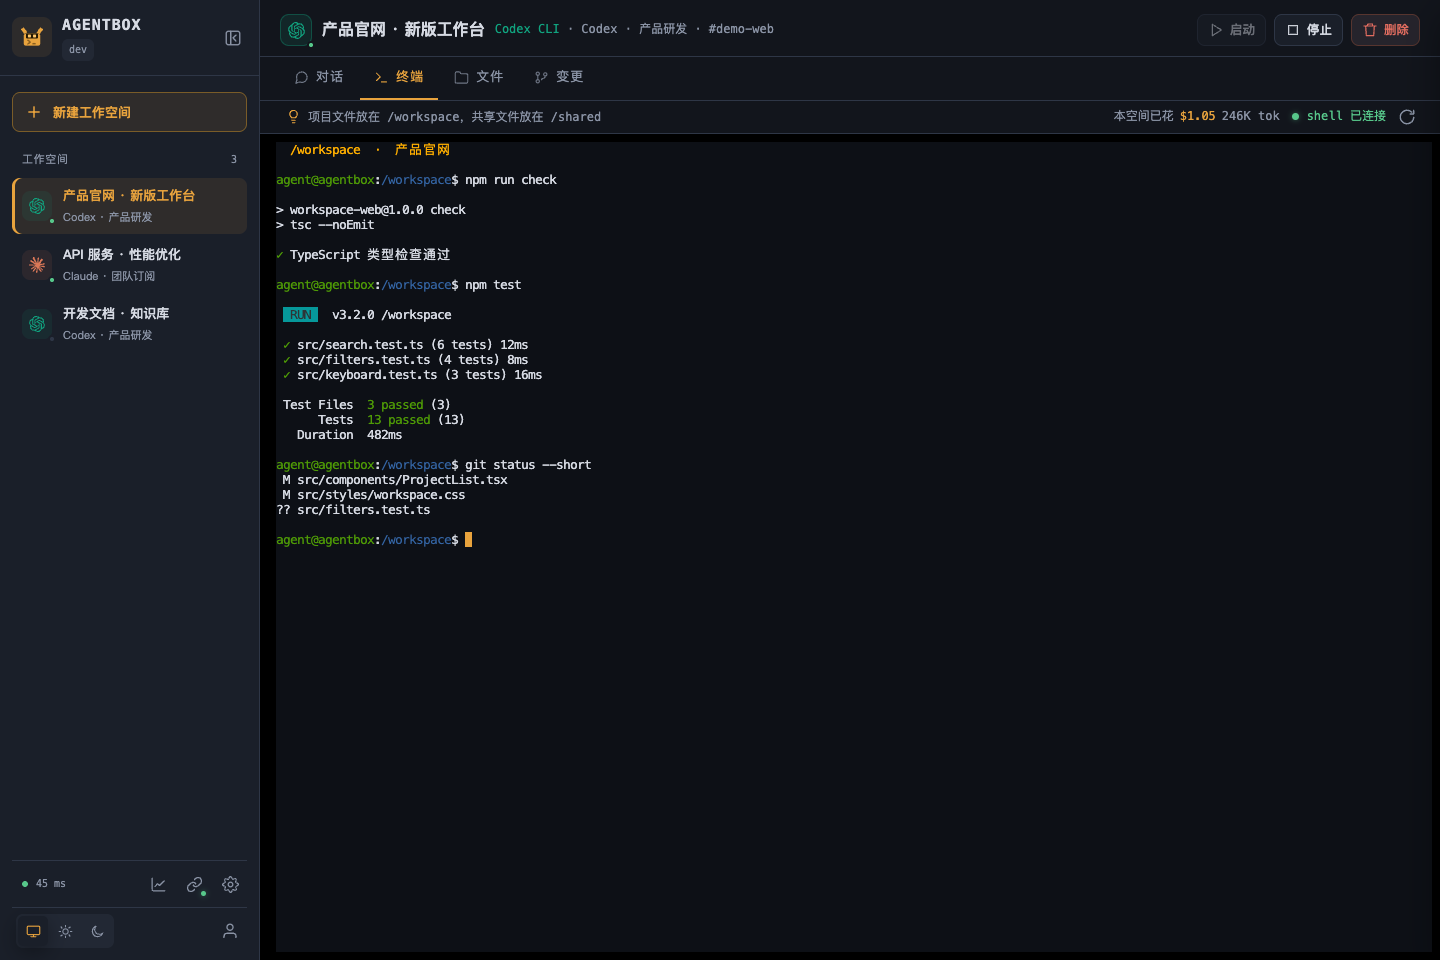
Agentbox is a self-hosted environment for running Claude Code and Codex CLI from a browser. It combines AI chat, a terminal, project files, Git review, account administration, and usage tracking in persistent workspaces hosted on your own server.
The server is distributed as a single Go binary with an embedded TypeScript frontend. It stores application state and chat history in SQLite and uses Docker containers to isolate coding workspaces. Persistent directories preserve project files, home configuration, and shared resources independently of the container lifecycle.
Agentbox is especially useful when you want to begin a coding task on one device and resume it elsewhere without rebuilding the environment. You can use streaming Web chat for task-oriented work or open the browser terminal to work directly with the original Claude Code or Codex CLI.
Key features
- Persistent workspaces: Project files, home configuration, shared files, and chat history remain on your server.
- Two agent interfaces: Switch between browser chat and the original command-line tools.
- Integrated delivery workflow: Upload or clone a project, assign a task, inspect files, review Git diffs, and commit or download the result.
- Central account pool: Administrators can configure Claude and Codex OAuth subscriptions, API keys, relay endpoints, access scopes, and egress proxies.
- Usage and cost records: Filter usage by user, model, and time while inspecting tokens, pricing sources, latency, and recorded costs.
- Reusable resources: Each user receives a shared directory mounted as
/sharedin all of their workspaces. Home templates, Claude skills, and MCP configuration are also supported. - Optional private-network access: The
abox-linkclient can expose explicitly allowed repositories, databases, and services to cloud-hosted workspaces. - Responsive interface: The console supports deep links, light and dark themes, and mobile layouts.
Understand the architecture
Your browser connects to the Agentbox server over HTTP or HTTPS and WebSocket connections. The server controls workspace containers through the local Docker API and stores application records in SQLite. Each workspace has its own container and persistent directories.
A workspace can contain multiple chat threads, although only one Web chat turn runs at a time in that workspace. The main persistent locations are /workspace, /home/agent, and /shared. Files that must survive container replacement should be stored in one of these locations.
Important: Persistent files do not mean persistent processes. Reconnecting after a terminal network interruption can restore a tmux session, but stopping or rebuilding a container terminates its running processes.
Prerequisites
The quickest installation method targets a Linux server with systemd. Release packages support Linux x86_64 and arm64.
- Ubuntu 22.04 or newer, or Debian 12 or newer, can have missing dependencies and Docker installed automatically.
- Other Linux distributions need Python 3.9 or newer, Git, curl, CA certificates, timezone data, and a local Docker Engine.
- The first workspace image build requires access to container registries, Debian package repositories, and npm.
- For remote access, TCP port
8180must be allowed through the server firewall or security group unless you use SSH forwarding or a reverse proxy.
Prebuilt installations do not require Go or Node.js on the server.
Install Agentbox with the release installer
1. Run the installer
Connect to the Linux server and run:
curl -fsSL https://raw.githubusercontent.com/devilcoolyue/agentbox/main/install.sh | sudo bashThe installer selects the latest stable release by default. The README identifies v0.1.5 as the current stable release. To pin that version, use:
curl -fsSL https://raw.githubusercontent.com/devilcoolyue/agentbox/main/install.sh | sudo bash -s -- --version v0.1.5The installation process verifies the release package, builds the workspace image with pinned tool versions, creates configuration, generates a random administrator password, and starts agentbox.service. The initial image build can take several minutes.
2. Open the console
When installation finishes, note the administrator password printed in the terminal. Open the following address, replacing the placeholder with the server address:
http://YOUR_SERVER_IP:8180Sign in with the username boxadmin and the generated password. Configure HTTPS before exposing Agentbox for ongoing public use.
3. Restrict Agentbox to a reverse proxy
If Agentbox should only accept local connections, append the listen option during installation:
curl -fsSL https://raw.githubusercontent.com/devilcoolyue/agentbox/main/install.sh | sudo bash -s -- --listen 127.0.0.1:8180You can then place an HTTPS reverse proxy with WebSocket support in front of the service. Release installations store configuration in /etc/agentbox and application data in /var/lib/agentbox.
Configure a Claude or Codex account
After signing in, open System settings → Account pool, shown in the current Chinese interface as 系统设置 → 账号池. Add either a Claude or Codex account.
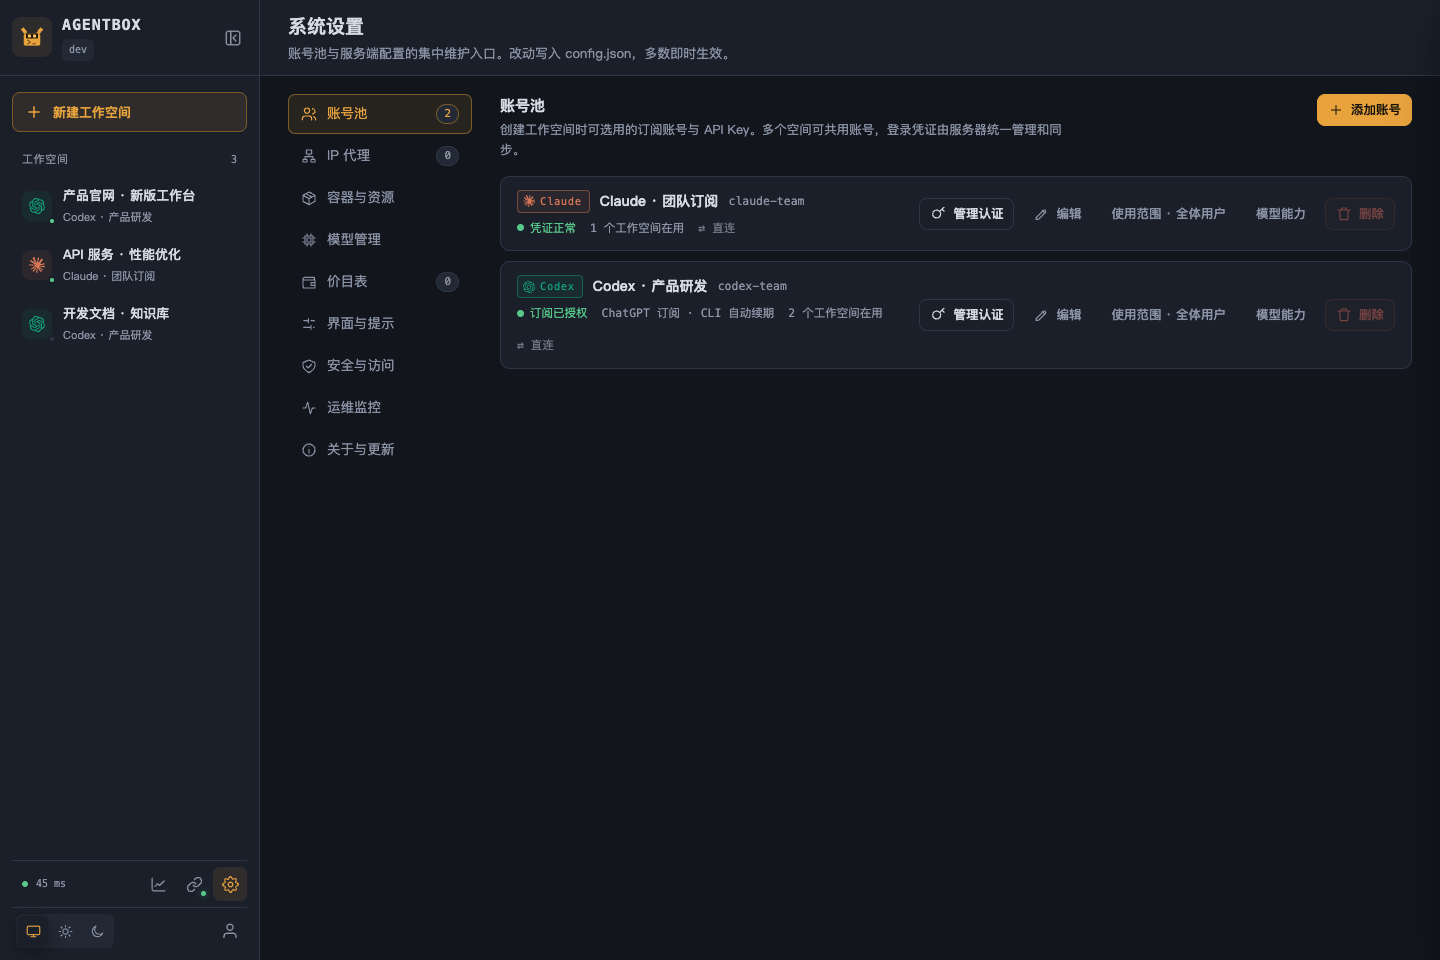
Agentbox supports the following connection methods:
- Claude subscription: Choose Subscription OAuth and paste the authorization code.
- Codex subscription: Choose Subscription OAuth and paste the complete callback URL.
- API or relay account: Enter the provider endpoint and key. A Codex relay must match the protocol expected by the provider.
Set a recognizable account name, its egress proxy if required, and an access scope. An account can be available to all users, selected users, or administrators only. Administrators can use every configured account.
Workspace users with terminal access can read credentials delivered to command-line tools inside their containers. Shared account pools should therefore be limited to trusted users. Revoking access prevents new operations and credential synchronization, but complete revocation may also require stopping affected containers and rotating upstream credentials.
Create your first workspace
- Create a workspace and give it a descriptive name.
- Select Claude Code or Codex CLI as the agent.
- Select an account that your user is authorized to use.
- Import a project by uploading it through Files or cloning it in Terminal.
- Open Chat and submit a focused coding task.
- Inspect the edited files and review the Git diff under Changes.
- Commit the changes locally or download the project files.
Upload and inspect project files
The Files interface provides a directory tree, uploads, editing, previews, and archive downloads for project and shared directories. The source viewer includes line numbers, syntax highlighting, line and column navigation, current-line highlighting, and fullscreen mode.
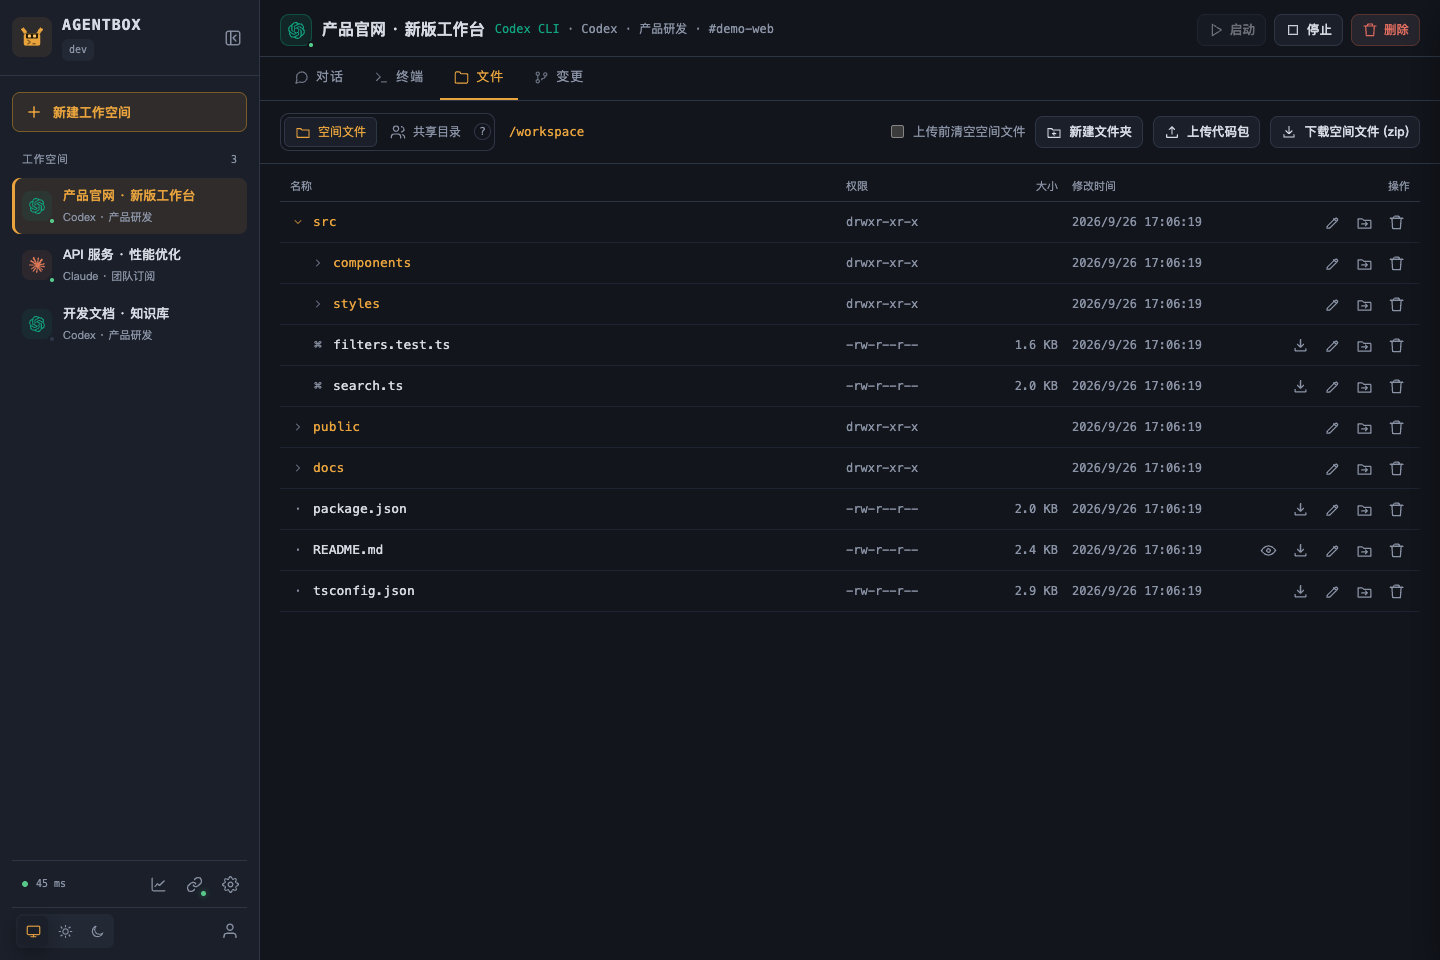
Web file operations use restricted directory handles and do not follow symbolic links. Uploads are validated in temporary directories, and editor saves use atomic replacement. Command-line tools inside the container can still use links supplied by templates.
Clone a repository from the terminal
Open Terminal and run normal shell commands. For example:
cd /workspace
git clone https://github.com/OWNER/PROJECT.git
cd PROJECT
git status
Agentbox includes the original agent CLIs and common development tools in its workspace image. Terminal sessions use tmux so you can reattach after a browser or network disconnection.
Assign a task in Web chat
Open Chat and describe the requested change, relevant constraints, and the validation you expect. For example:
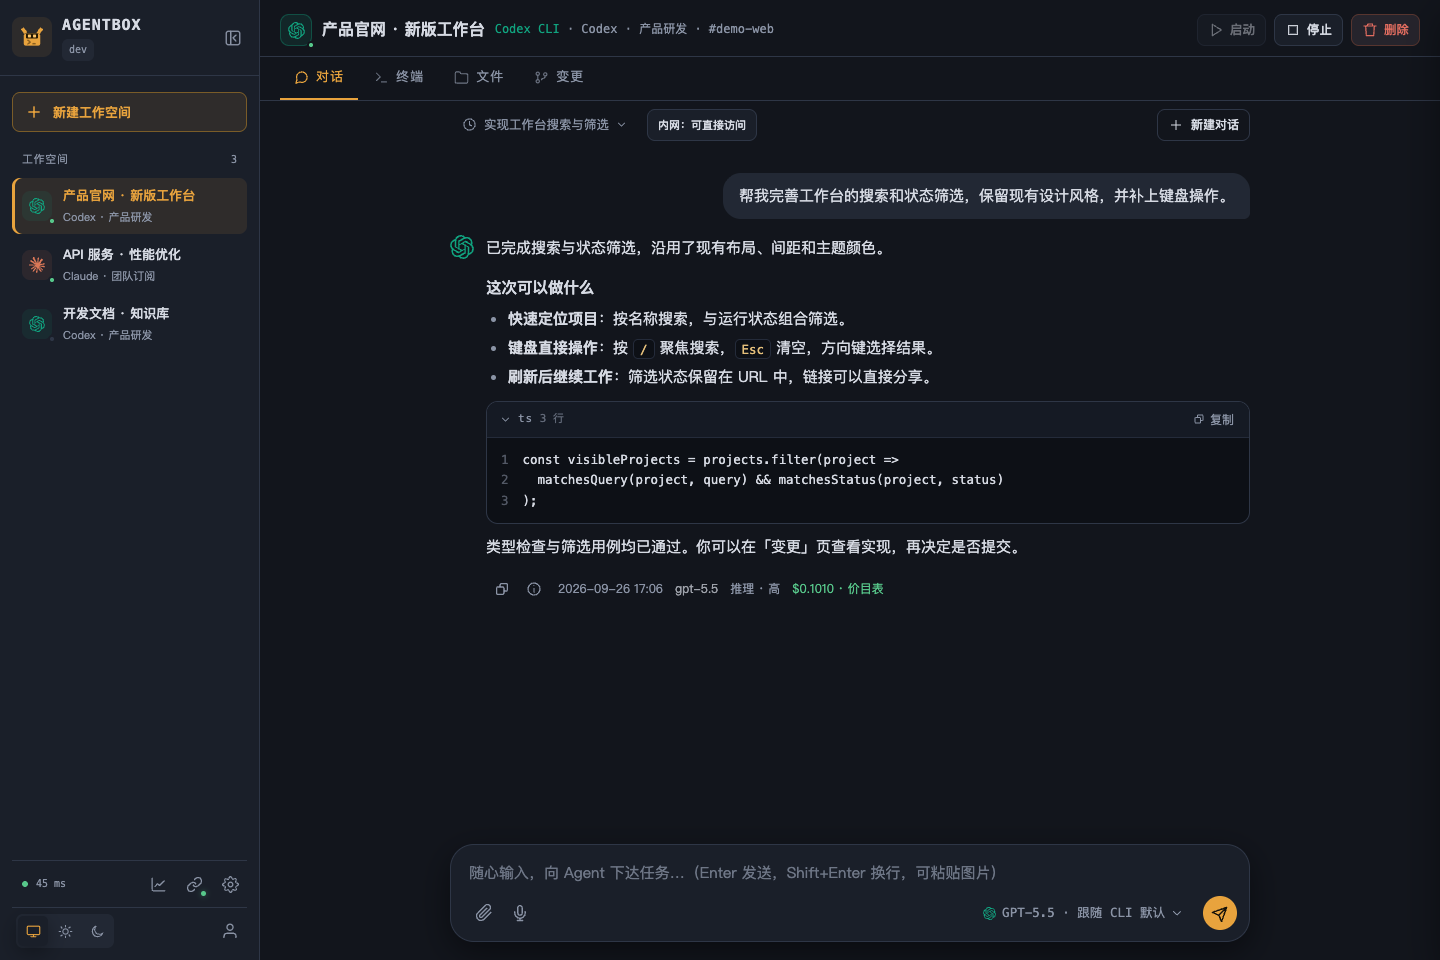
Inspect this project and add input validation to the user registration endpoint. Preserve the existing API response format, add tests for invalid email addresses, and run the relevant test suite.Chat supports model and reasoning-effort selection. Each response records its time, model, settings snapshot, and cost. Claude runs streaming headless turns. Codex prefers its app-server integration and falls back to execution mode if the handshake fails.
Review and deliver the result
After the agent finishes, open Changes to inspect modified files and colored diffs. Review the complete file when a diff lacks enough context.
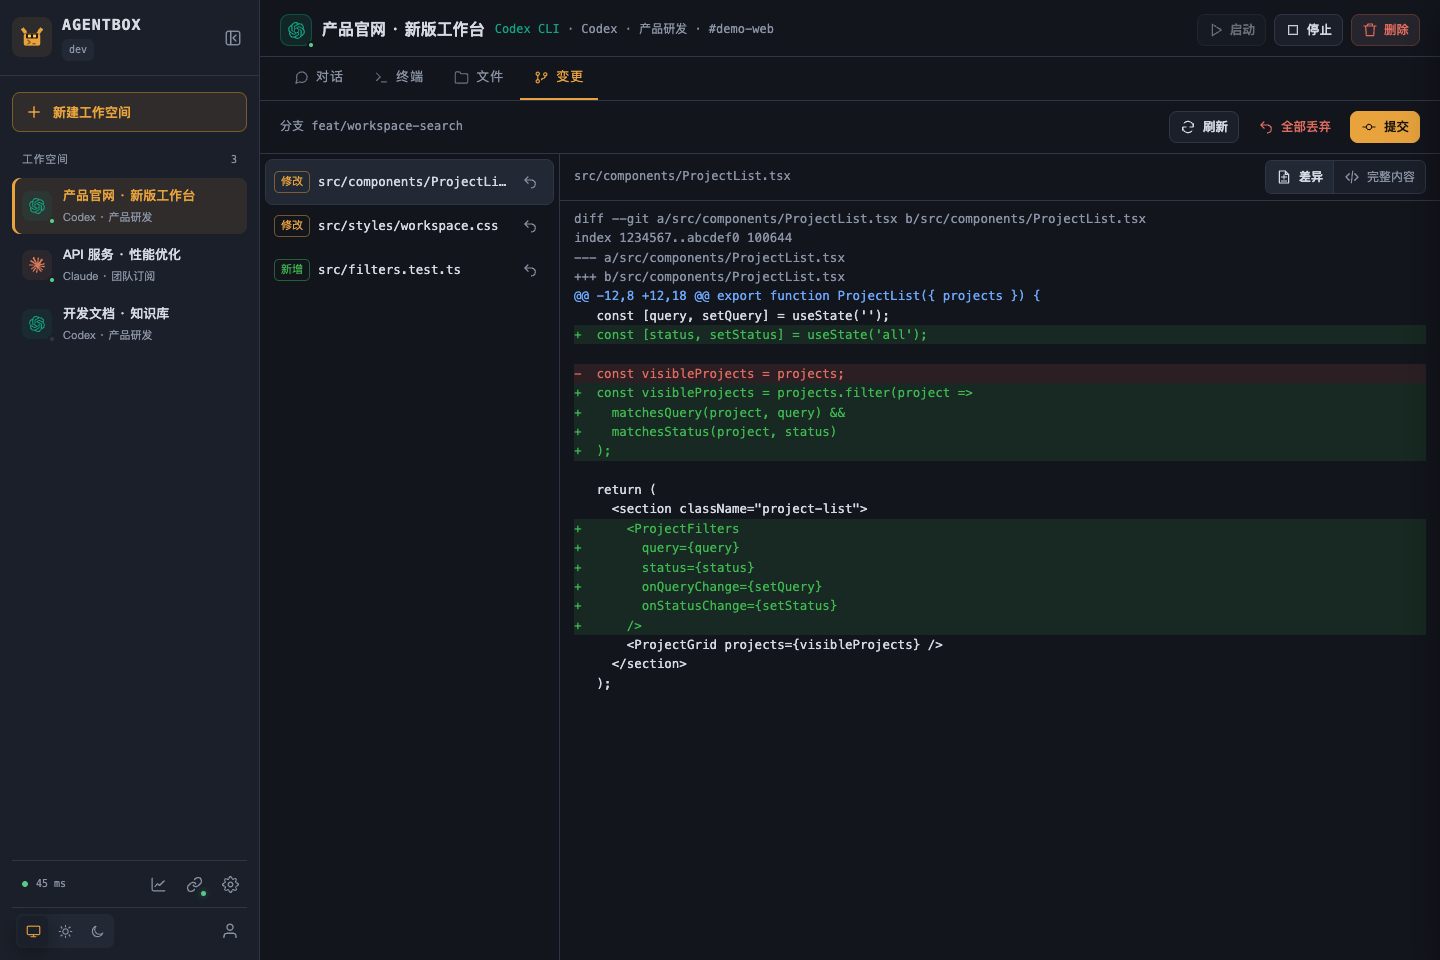
Web commits are local and do not automatically push to a remote repository. They also do not run Git hooks or signing. Use the terminal when hooks or signed commits are required.
Agentbox also provides Git management for repository connections, cloning, fetching, fast-forward pulls, previewed pushes, branch operations, and GitHub or GitLab pull request and merge request creation. Repository connections can use HTTPS tokens or SSH private keys.
Build and run from source
Use the source workflow when you plan to modify Agentbox or contribute to the project. The documented build environment uses Linux with Docker, Go 1.26.6 or a compatible automatic toolchain, Git, Python 3, curl, iproute2, and OpenSSL. Node.js 22 and npm are only required when editing the main TypeScript console.
1. Clone and build
git clone https://github.com/devilcoolyue/agentbox.git
cd agentbox

go build -o agentbox ./cmd/agentbox
./scripts/build-image.sh
The user running the image build needs Docker access. At startup, the server must also set mounted directory ownership to 1000:1000; the supplied systemd service runs as root.
2. Create a configuration
cp config.example.json config.json
openssl rand -hex 24
Copy the generated random value into auth_token. For an initial test, leave accounts and proxies empty and add real accounts later through the Web UI.
{
  "listen": "127.0.0.1:8180",
  "auth_token": "CHANGE_ME_TO_A_LONG_RANDOM_TOKEN",
  "data_dir": "data",
  "agent_image": "agentbox-agent:latest",
  "accounts": [],
  "proxies": []
}
Replace the placeholder before startup because configuration validation rejects it.
3. Start the server
sudo ./agentbox -config config.jsonFor a server that listens only on localhost, create an SSH tunnel from your computer:
ssh -N -L 8180:127.0.0.1:8180 user@your-serverOpen http://127.0.0.1:8180 locally and sign in with boxadmin and the configured auth_token. Once the administrator account is created, its password is stored in SQLite; changing auth_token later does not reset that password.
4. Install the systemd service
After stopping the foreground process, install and deploy the service from the repository:
sudo ./deploy/install.sh
sudo ./deploy/deploy.sh
The first script installs the service and timers. The second builds and replaces binaries, restarts the service, and performs a health check.
Monitor usage and costs
The Usage page records model activity and lets administrators filter by user, model, and time. Individual records include token usage, cost sources, and latency. Regular users can see their own records, while administrators can see records for all users.
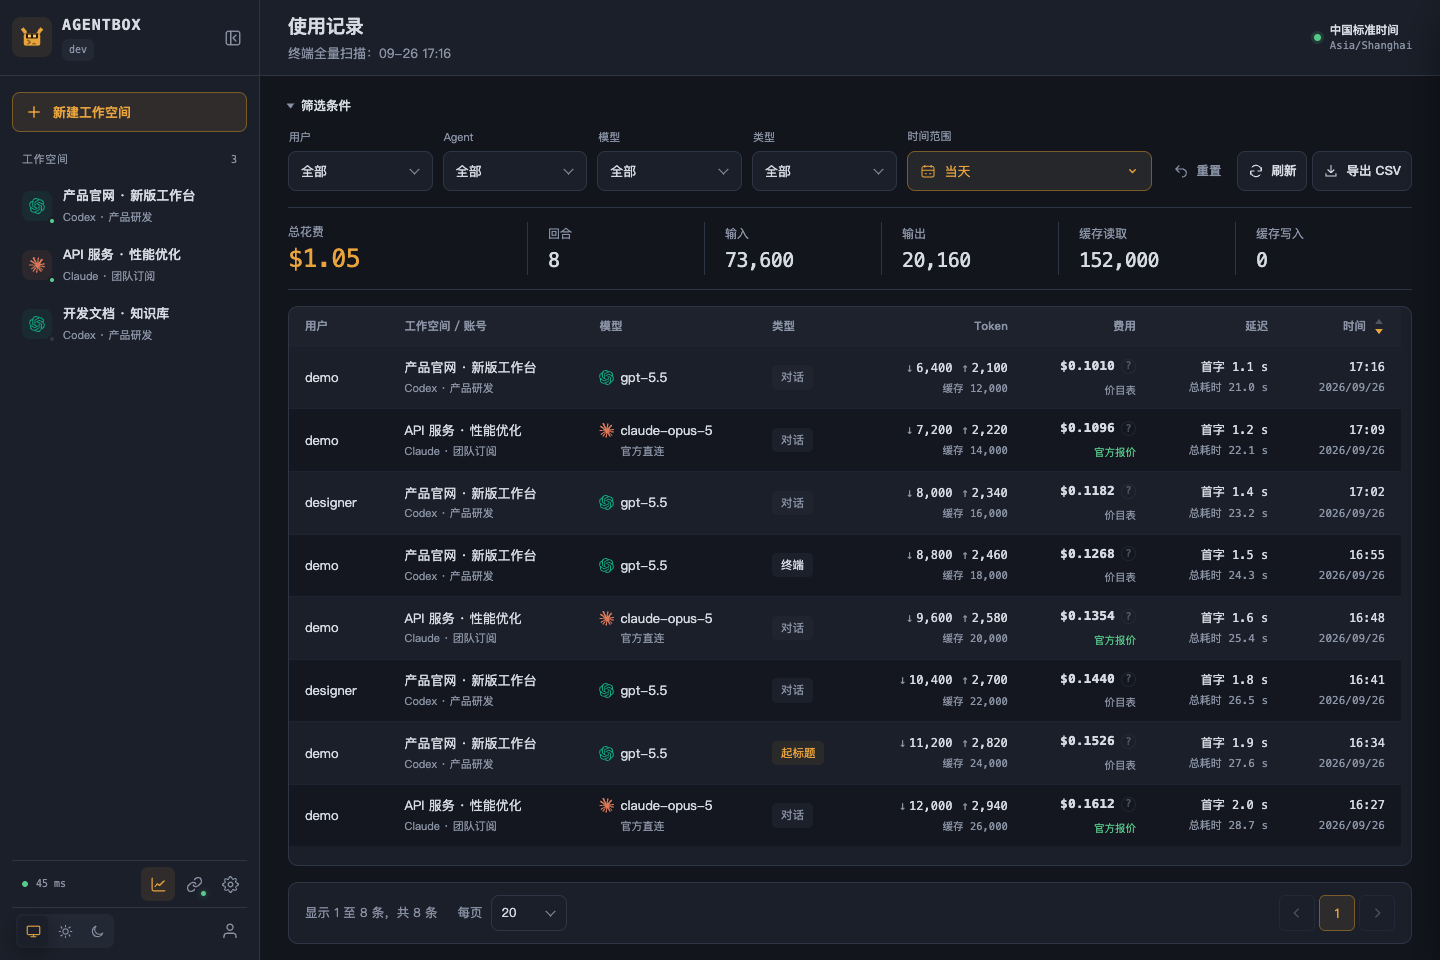
Pricing catalogs can use a models.dev source preset or custom HTTPS sources. Price updates retain historical snapshots, and custom prices remain protected. Web turns are priced using the table pinned when the turn starts.
Credit limits are not real-time hard caps. A Web turn settles after it finishes, so the turn that exhausts a balance can overspend. Backfilled terminal usage is recorded but does not deduct credits.
Advanced tips
Use shared resources across workspaces
Each user's shared directory is mounted at /shared in all of that user's workspaces. Store reusable scripts, reference files, or artifacts there rather than copying them into every project. Agentbox also supports system and per-user home templates.
Reach private services with abox-link
The optional abox-link client allows a cloud workspace to reach allowlisted services available from your computer or another private machine. It can run through a local panel or in command-line server mode with --server.
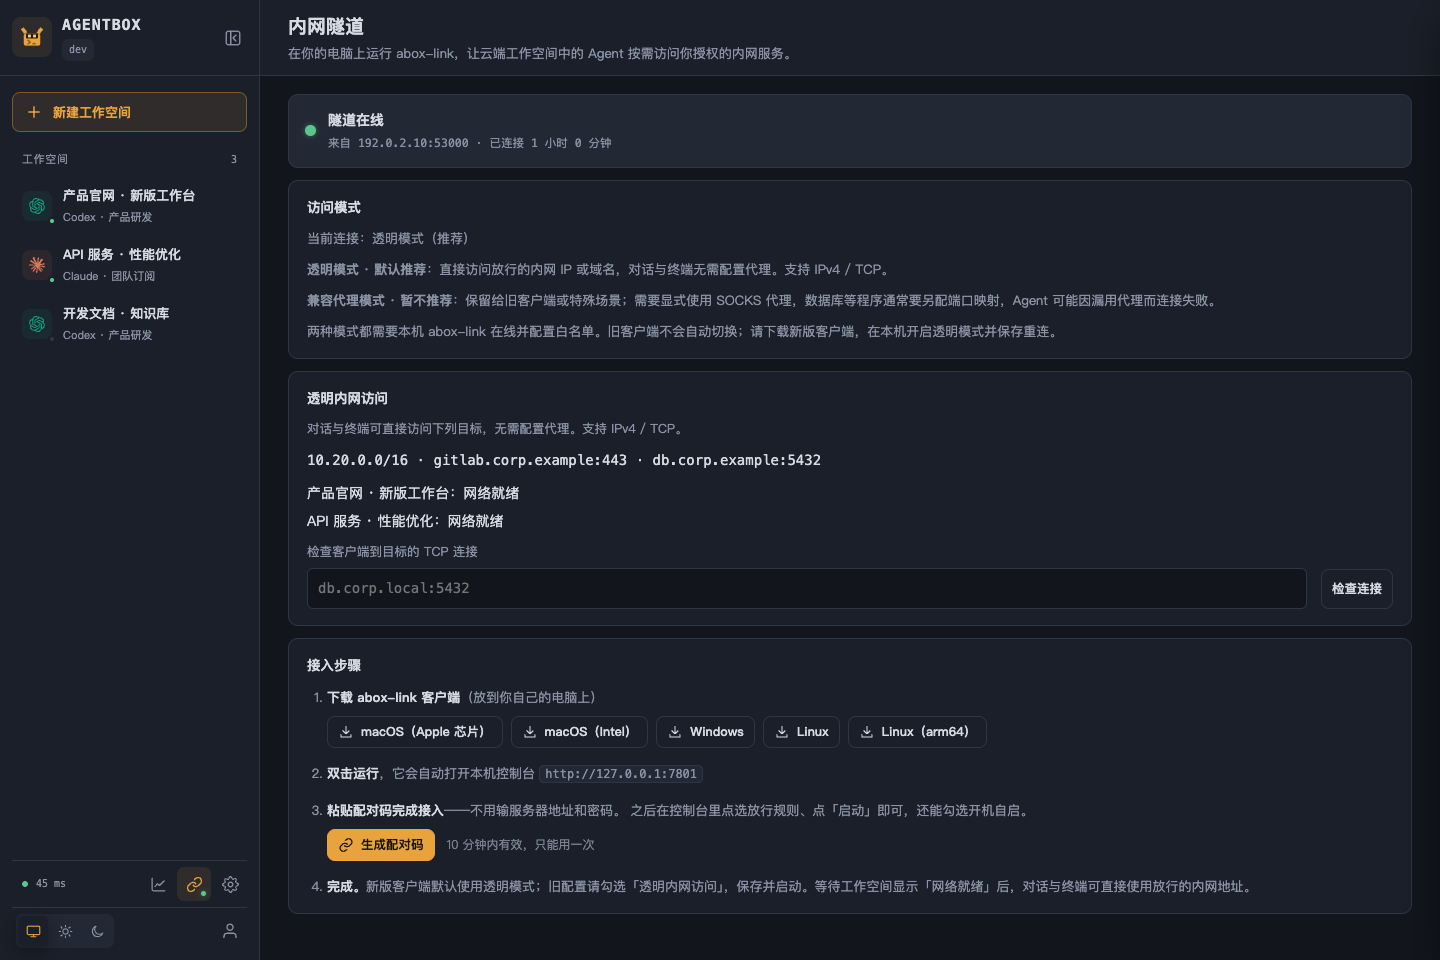
Use a narrow allowlist and expose only the repositories, databases, or services needed by the workspace. Agentbox shows both client and workspace connection readiness. Regular browser use does not require abox-link.
Plan container capacity
Each workspace container defaults to 2048 MiB of memory, 2 CPUs, and 512 processes. Size the server for the expected number of concurrently running workspaces. Administrators can also configure global and per-user container limits and reserved disk space.
Back up the correct data
Default system backups include the database, configuration, account credentials, and template layers, but exclude workspace data. Use agentbox backup --full when user files and history must also be captured. A full backup requires stopping the service and relevant containers first. Use backup-verify to validate an archive and restore --to to restore it into a new directory.
Understand the security boundary
Agents can execute code inside workspace containers. The default permission mode is bypassPermissions. Containers run as a non-root user with resource limits and no-new-privileges, but the Agentbox server itself has Docker access. Deployment and administration should therefore remain in the hands of trusted operators.
Use the optional remote browser carefully
Agentbox can provide a full desktop browser inside a workspace, including persistent login state, tabs, fullscreen, adjustable image quality, clipboard support, and downloads. Administrators must build and select the optional agentbox-agent:browser image. Website authentication remains separate from Claude or Codex CLI authorization.
Operational limitations to remember
- Only one Agentbox process may use a particular
data_dir. - The current production architecture uses one machine, one server process, and a local Docker daemon.
- Deployments and restarts briefly disconnect connected clients.
- Refreshing remote Git status does not fetch; ahead and behind values come from the local cache.
- Revoking an account does not remove credentials already delivered to a running container.
- Stopping or rebuilding a workspace container terminates its processes even though persistent files remain.
- Git review may start a stopped workspace and applies the same credit admission checks as terminal access.
Conclusion
Agentbox turns a Linux server into a persistent browser-based coding environment for Claude Code and Codex CLI. Start with the release installer, add an account, create a workspace, and move from a chat task to reviewed code through the integrated Files, Terminal, and Changes views. For production use, add HTTPS, control account access carefully, monitor resource usage, and establish a backup plan that includes workspace data when required.
For deeper configuration and operational guidance, consult the Agentbox repository, the documentation index, and the deployment and operations guide.