

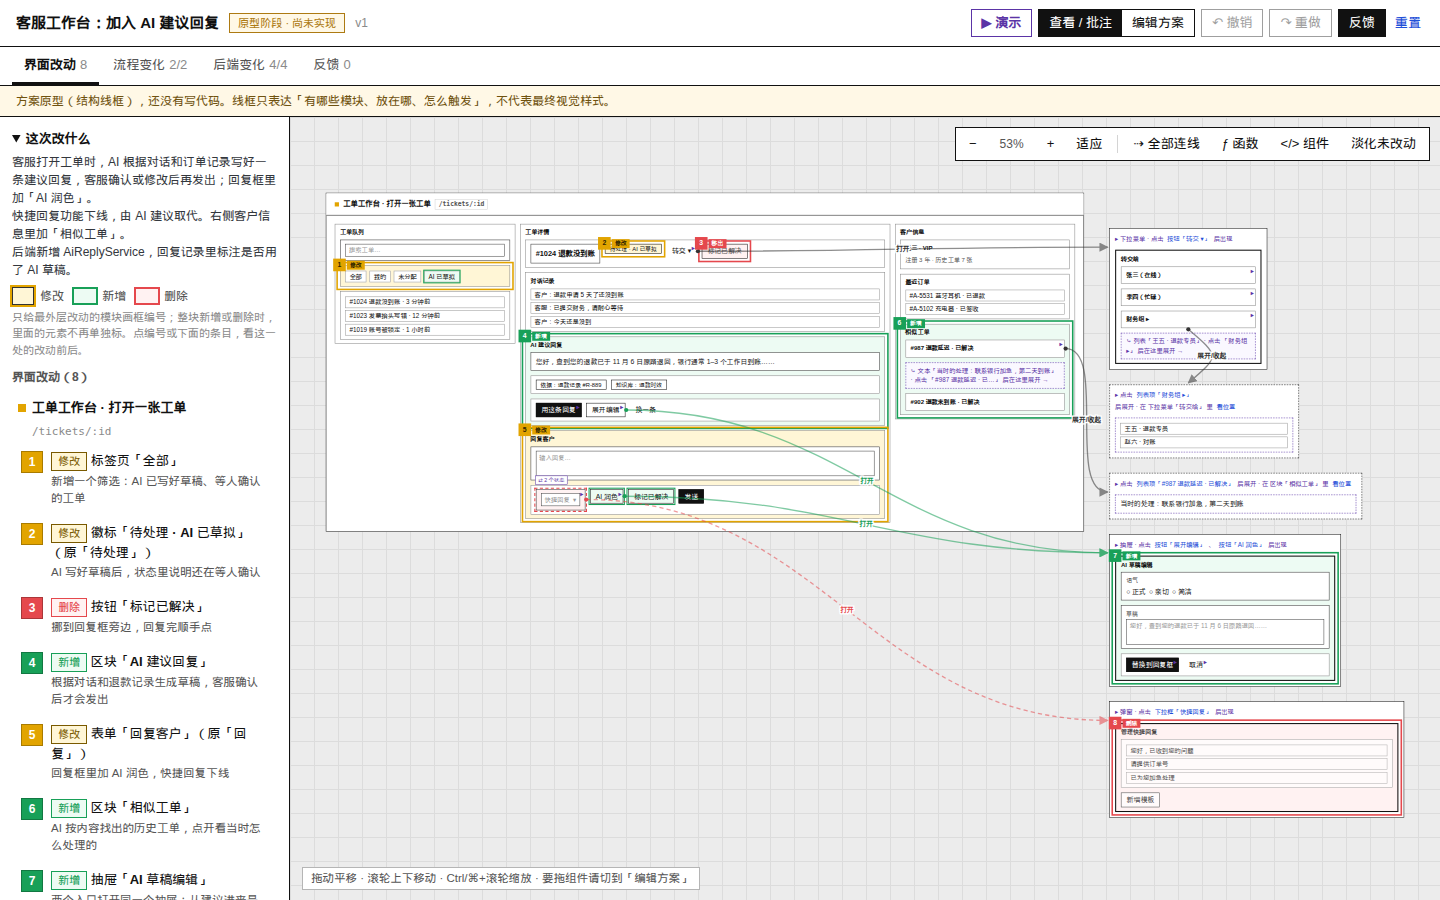
What is smyw
smyw, short for “show me you want,” is a skill for coding Agents, suitable for Agents such as Claude Code and DeepSeek Harness that support SKILL.md. Before modifying pages, interaction flows, or frontend and backend interfaces, it has the Agent read the code, write a structured spec, and then generate an offline-openable single-file HTML prototype.
This prototype is not a final visual design. It is a low-fidelity wireframe for expressing module composition, layout, trigger relationships, and functional changes. The final implementation should still follow the project’s existing design guidelines.
What problem does it solve?
Traditional Agent coding workflows often move directly from written requirements to implementation, which can lead to misunderstandings about page structure, interaction methods, or interface boundaries. smyw adds a visual confirmation stage between requirements and code:
- The user describes a feature requirement.
- The Agent reads the project code and generates
spec.json. - The build script validates the spec and outputs
preview.html. - The user views, demonstrates, drags, and annotates the proposal in a browser.
- The user copies the feedback and sends it back in the conversation.
- The Agent applies the feedback and generates the next prototype version.
- Only after the user confirms the proposal does the Agent start writing code.
smyw is not intended to replace design tools. Its purpose is to help users and coding Agents reach a shared understanding before implementation of “what should change, where it should go, and how it should be triggered.”
Core features
Numbered markers and before-and-after comparison
The prototype draws the complete screen according to the real page layout and uses colors to distinguish changes: yellow indicates modifications, green indicates additions, and red indicates deletions. Only modules whose outermost layer changes are numbered, avoiding a large number of repetitive markers on inner elements.
After clicking a canvas number or an item in the change list on the left, the canvas focuses on the corresponding area. The right side displays local wireframes from before and after the change, field differences, the Agent’s explanation, code components, and related functions or interfaces.
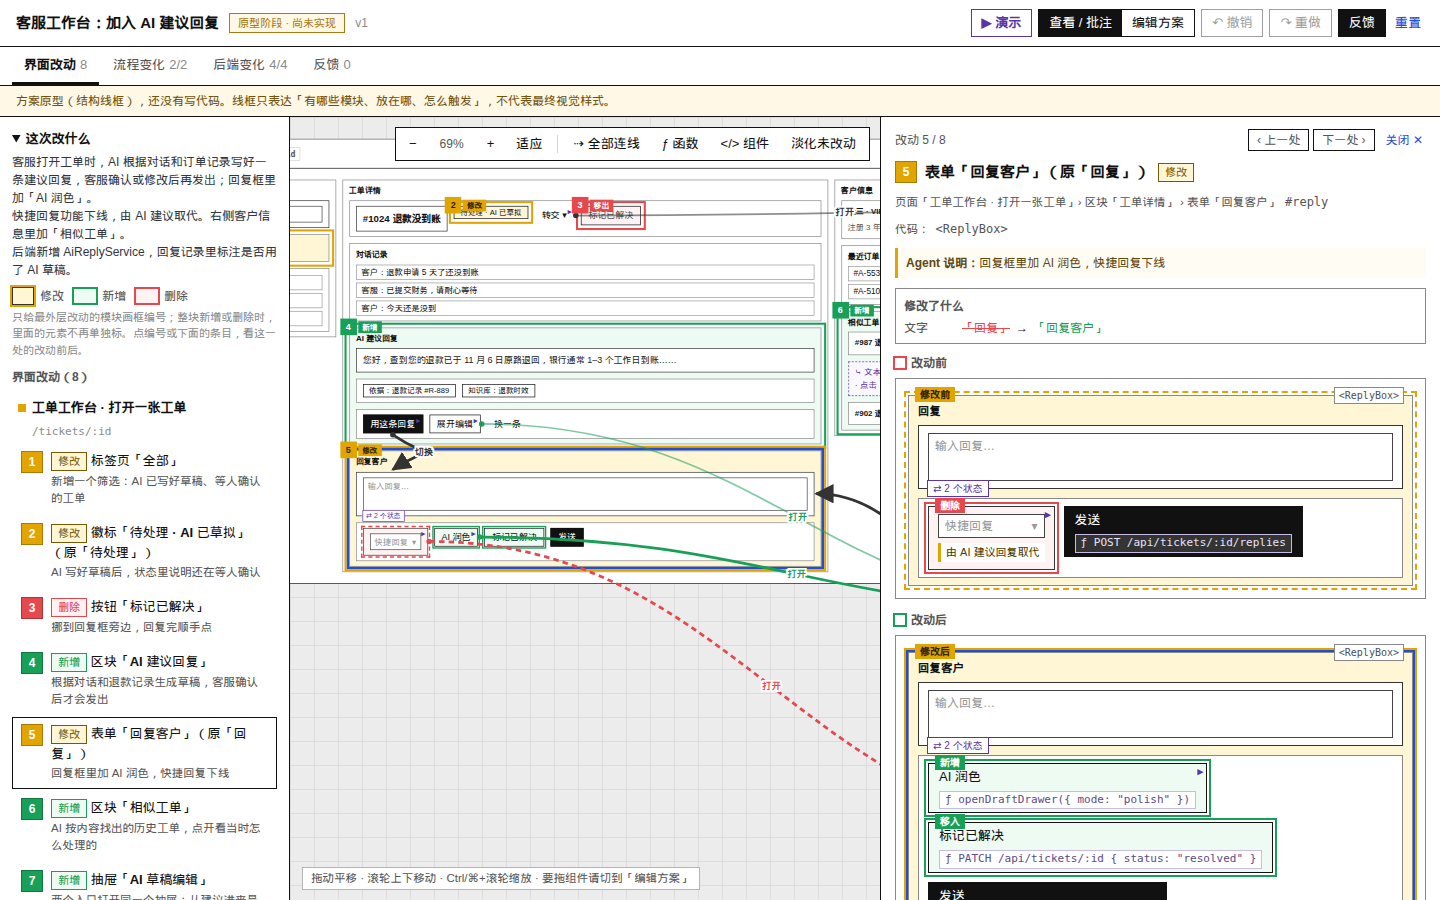
If an entire module is new, “Before” in the details shows that the module did not previously exist. Its internal buttons and text are no longer numbered individually.
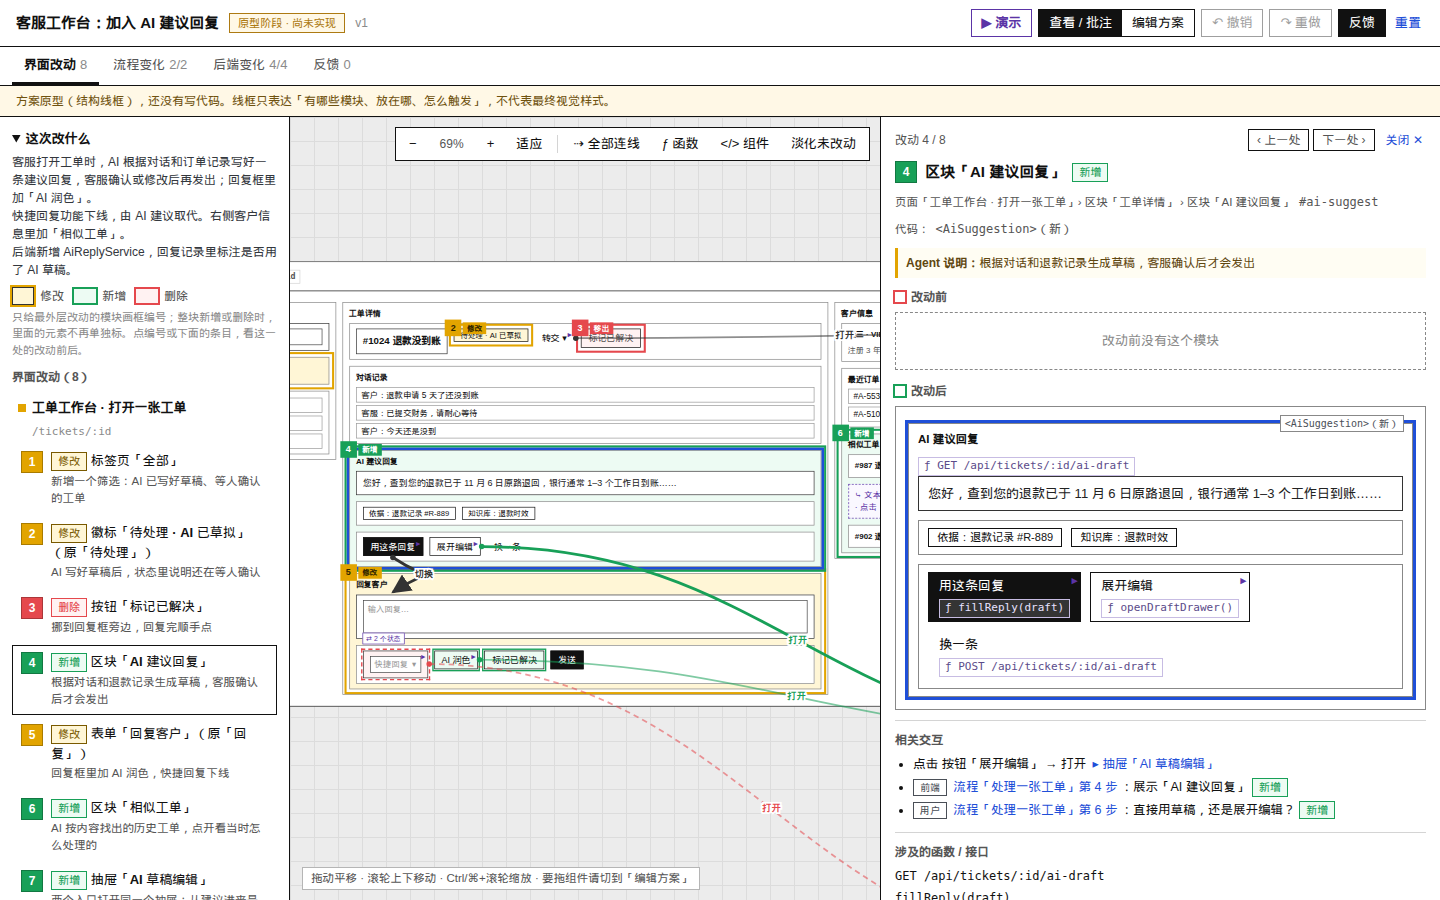
Accurately representing component movement
When a component moves from one location to another, the original location displays a red “move out” marker, while the new location displays a green “move in” marker. The two records can link to each other, making it clear that this is not a deletion followed by an unrelated addition.
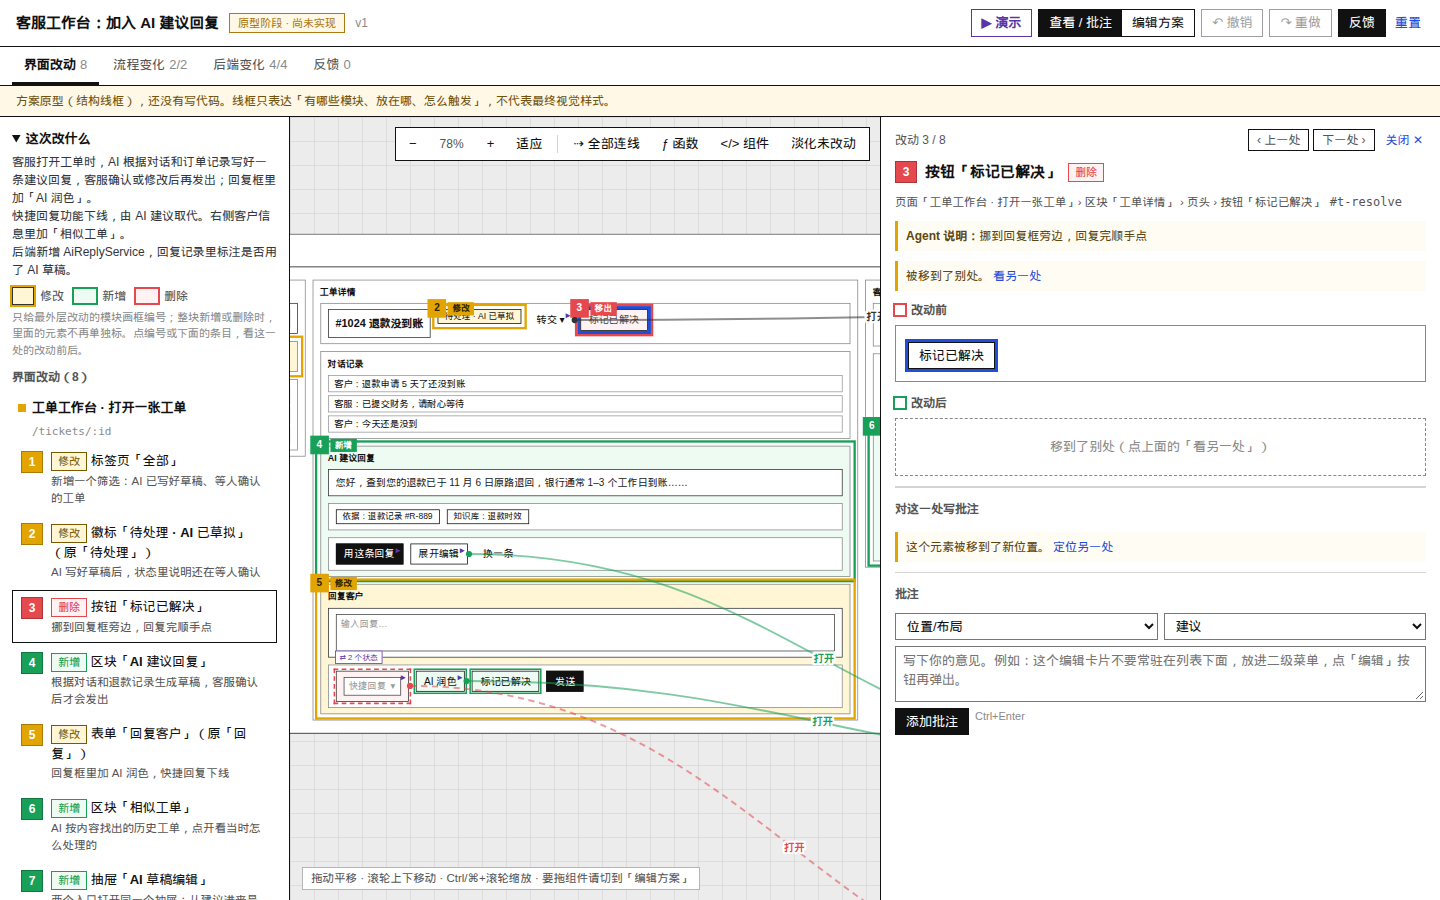
Modals, menus, and expandable content
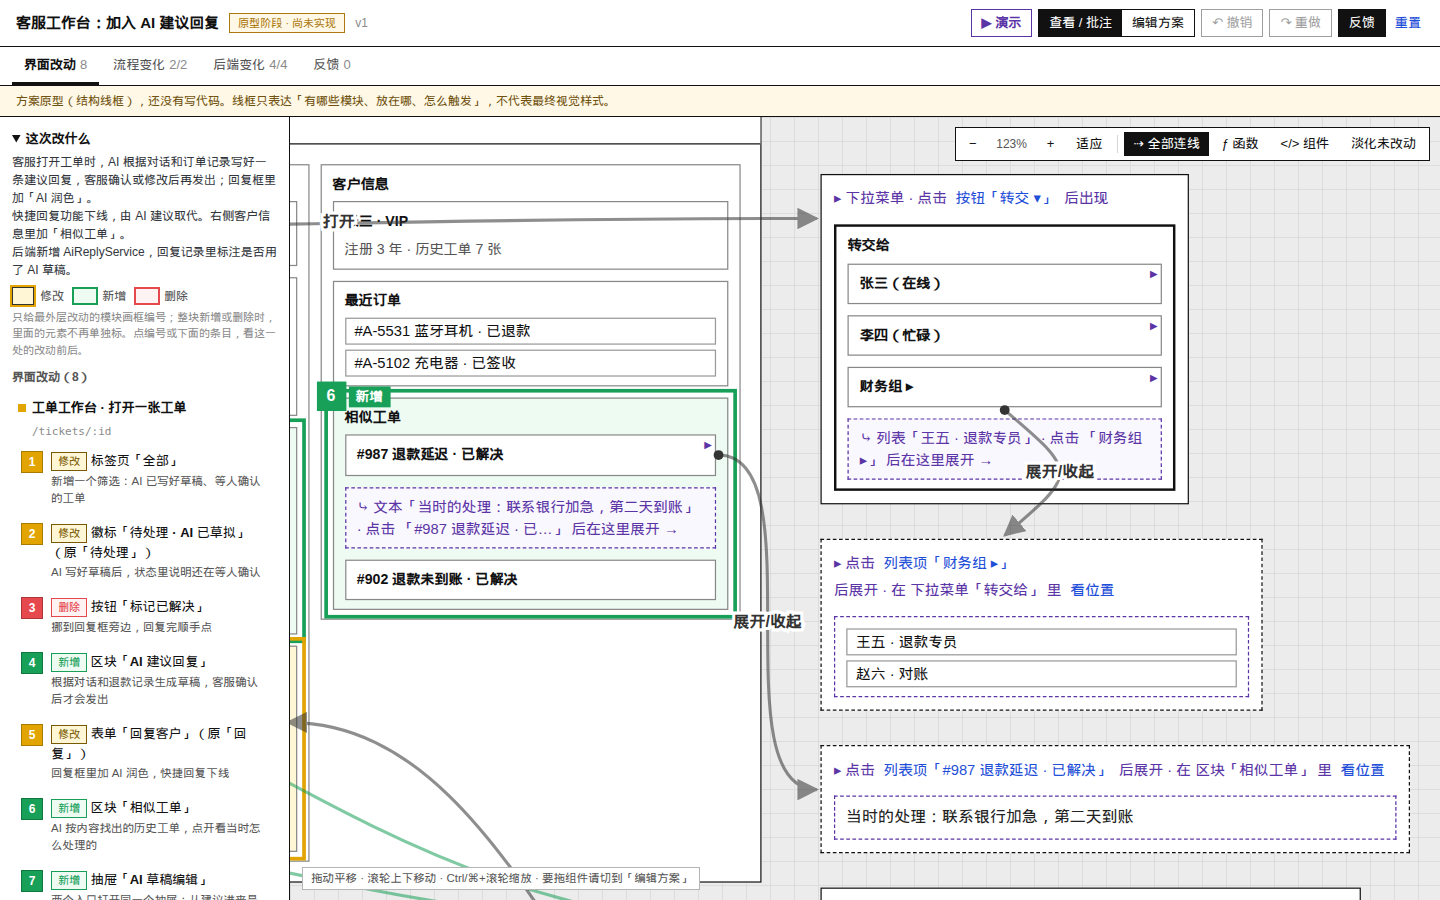
Modals, drawers, dropdown menus, popovers, and content that expands only after a click are placed in separate panels beside the main screen, with connecting lines pointing to their trigger buttons. A modal can be associated with multiple entry points, while a deleted modal is shown with red dashed lines.
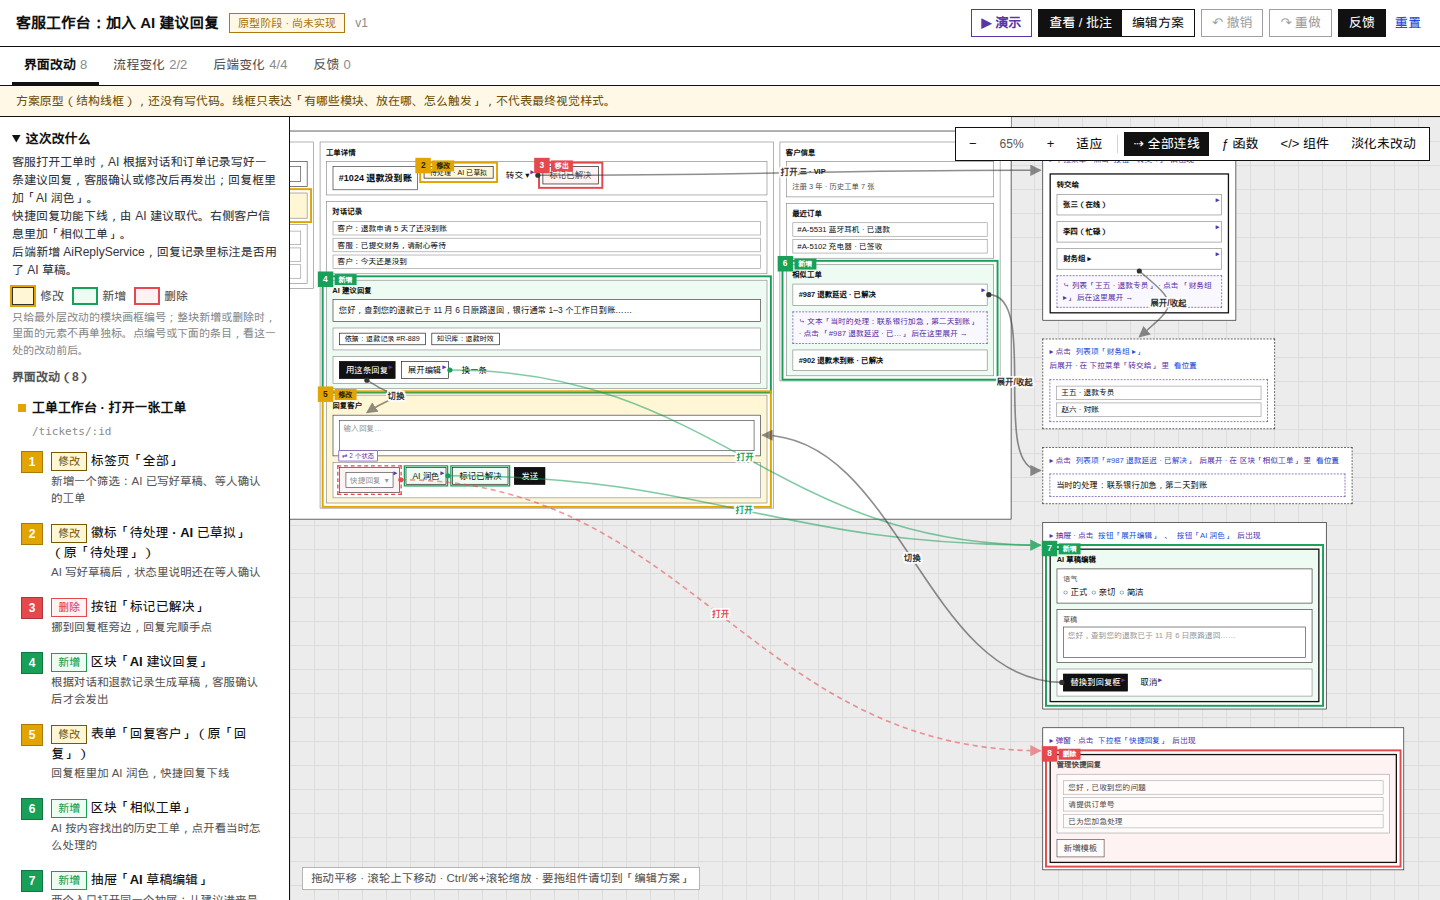
Multilevel menus are further split into adjacent panels. Content that expands in place leaves a purple dashed slot in the page, indicating where it appears after expansion. Page navigation and state-switching connections are hidden by default. They can be viewed when selecting the relevant elements or opened all at once with “All connections.”
Clickable demo mode
Click “▶ Demo” in the upper-right corner to hide the change frames and simulate real interactions in a single-screen view. It can demonstrate menu expansion, drawer sliding, modal opening, button state changes, and page navigation.
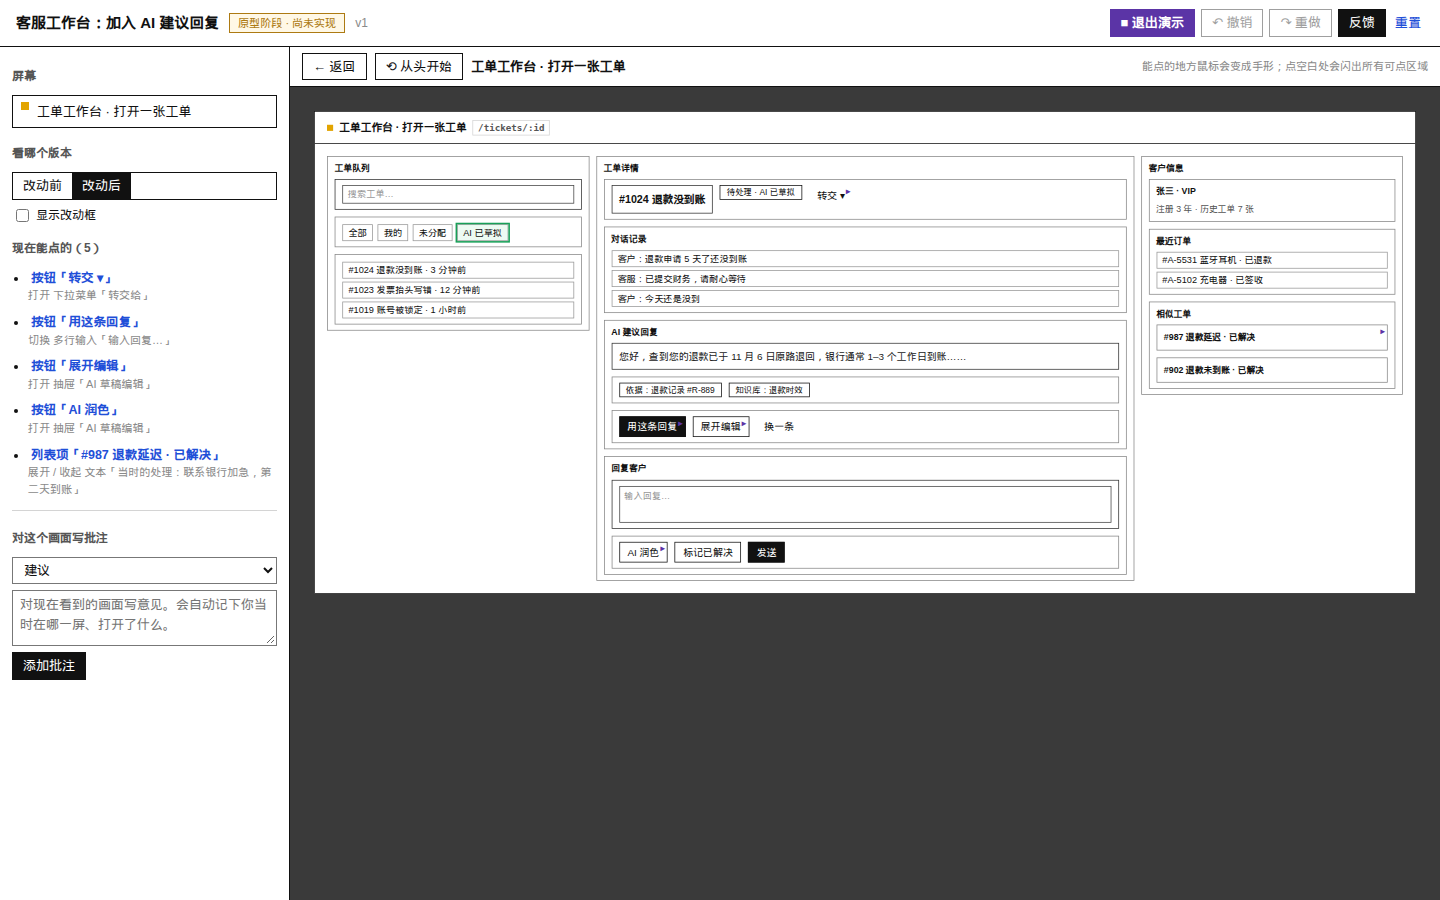
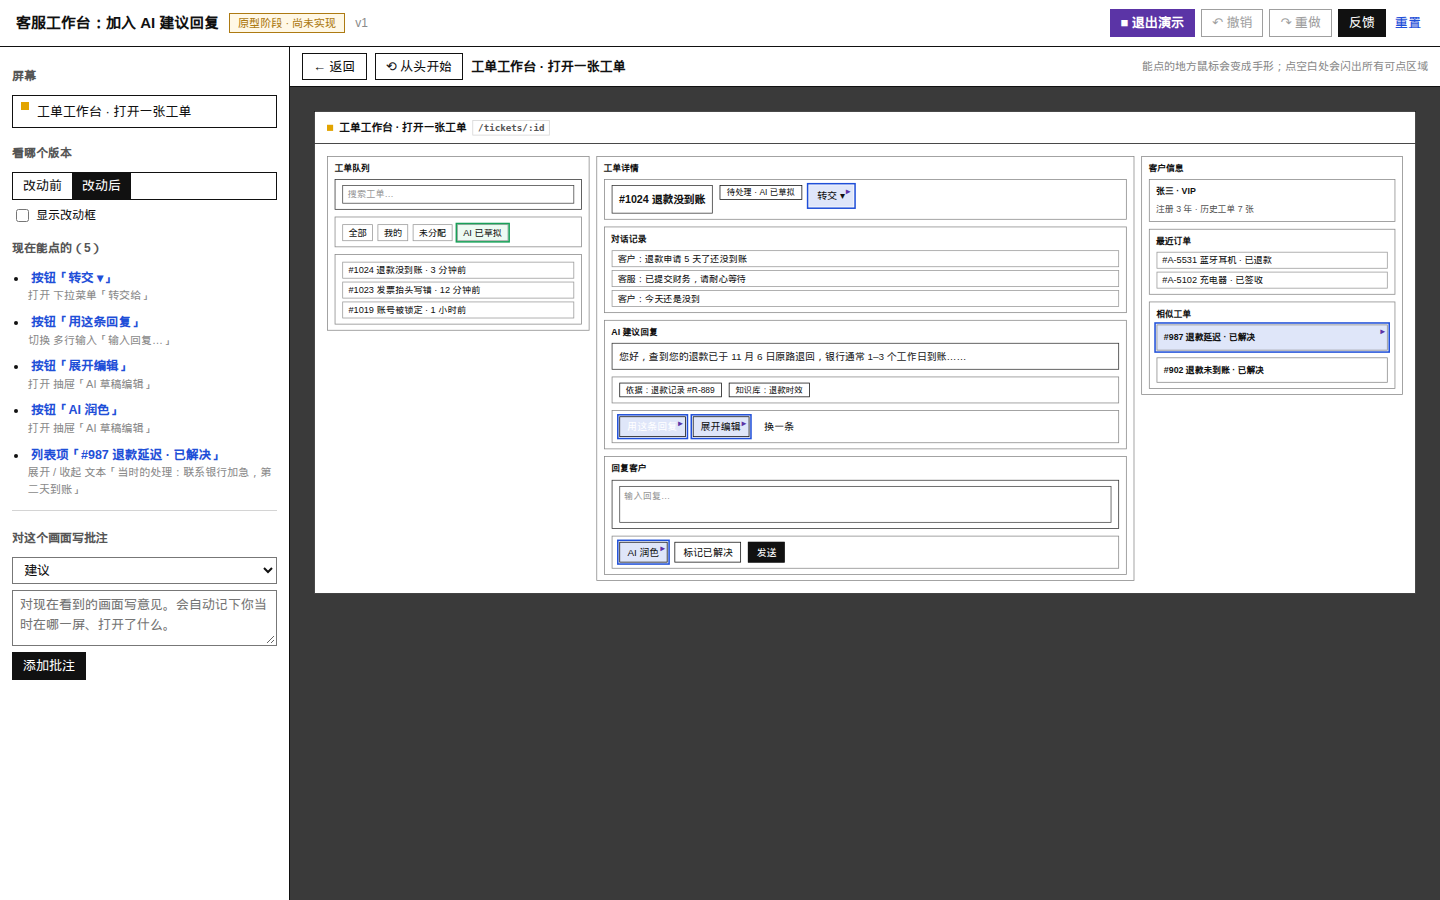
If you click an area that cannot be operated, all currently clickable locations flash with blue frames, and the available actions are listed on the left. The demo supports going back, restarting from the beginning, and switching between “Before” and “After.”
Direct editing and centralized feedback
- Edit structure: Drag components to change their order or container ownership, and modify their text, type, width, and arrangement.
- Convert form: Convert an inline module into a modal, dropdown menu, drawer, or popover. The system generates the trigger button and connecting lines.
- Undo and redo: Use Ctrl or Command plus Z to undo an operation.
- Element annotations: Add feedback for a specified element under categories such as position, interaction, component type, styling, copy, or missing functionality.
- Feedback levels: Mark annotations as “Must fix,” “Suggestion,” or “Question.”
- Overall feedback: Record style feedback and reference directions, and answer confirmation questions listed in advance by the Agent.
- Patch return: Structural changes are appended to the end of the feedback as patches located by ID, so the complete proposal does not need to be returned.
Prerequisites
Building a smyw prototype requires only Node.js 18 or later. The project itself needs no server and has no runtime dependencies. First, check the Node.js version:
node --versionIf you plan to run the repository’s end-to-end tests or regenerate screenshots, you also need to install Google Chrome. For non-default installation paths, specify the path through the CHROME environment variable.
Install the smyw skill
Step 1: Clone the repository
git clone https://github.com/nishuzumi/show-me-you-want-skill.git
cd show-me-you-want-skill
Step 2: Place the skill where the Agent can read it
Claude Code users can create a global symbolic link so that all projects can use smyw:
ln -s "$PWD/skills/smyw" ~/.claude/skills/smywIf the Agent reads a shared skills directory, you can also link it to:
ln -s "$PWD/skills/smyw" ~/.agents/skills/smywTo enable it in only one project, copy it to that project’s local skill directory:
cp -r skills/smyw <your-project>/.claude/skills/smywAfter installation, ask the Agent for a requirement that modifies the interface or an API, or simply say: “Show me a prototype first.”
Run the repository examples first
The repository includes two generated HTML examples. No server is required; open them directly in a browser:
skills/smyw/examples/helpdesk-ai/preview.html: a complete single-screen example adding AI-suggested replies to a customer service workspace.skills/smyw/examples/task-tags/preview.html: a multipage example showing an entire-page addition and an entire-page deletion.
After modifying an example’s spec, regenerate the preview with:
node skills/smyw/scripts/build.mjs skills/smyw/examples/helpdesk-ai/spec.jsonThe build output is a pure frontend single file that can be opened and reviewed offline.
Basic workflow from requirements to prototype
Step 1: Describe the requirements to the Agent
Describe the business goal and constraints as clearly as possible, but you do not need to decide every interface detail in advance. For example:
Add AI-suggested replies to the customer service ticket details. Read the existing pages and interfaces first; do not write code immediately. Use smyw to generate a prototype so I can confirm the drawer entry point, reply replacement flow, and affected interfaces.
Step 2: Check the generated spec and preview
The Agent saves the structured proposal in a directory similar to:
.smyw/<date>-<name>/spec.jsonIt then uses build.mjs to validate the spec and generate preview.html. After opening the preview, check it in this order:
- Use “Fit” first to fit the complete canvas in the viewport.
- Check whether the yellow, green, and red change frames match the requirements.
- Click the change list items in sequence to verify the before-and-after comparisons and field changes.
- Check whether the related components, functions, and interfaces correspond to the existing code.
- Open “Flow changes” and “Backend changes” to check cross-layer effects.
- Enter demo mode and actually click the menus, modals, drawers, and state buttons.
Step 3: Edit and annotate the proposal
If the structure does not meet expectations, switch to “Edit proposal” and drag components directly, or convert inline content into a modal. For feedback that is not suitable for direct editing, select an element, add an annotation, and set its category and priority.
It is recommended to distinguish clearly between three types of feedback:
- Must fix: Issues that must be addressed before implementation.
- Suggestion: The Agent can evaluate whether to adopt it, but should explain why if it does not.
- Question: An issue that must be answered and clarified before deciding how to adjust it.
Step 4: Copy the feedback and send it back to the Agent
Go to the “Feedback” page, add overall style feedback, answer pending confirmation questions, and then click “Copy feedback.” Paste the generated Markdown into the Agent conversation.
The Agent typically saves the feedback as feedback-v<N>.md, then runs:
node skills/smyw/scripts/apply-feedback.mjs .smyw/<dir>/feedback-v1.md .smyw/<dir>/spec.json
node skills/smyw/scripts/build.mjs .smyw/<dir>/spec.json
apply-feedback.mjs backs up the old spec, applies the patches in the feedback, and increments the version number. If the feedback version does not match the current spec, the script refuses to apply it, preventing a newer proposal from being overwritten.
Step 5: Start coding only after confirmation
Review the next prototype and confirm that all “Must fix” feedback has been addressed and all “Questions” have been answered. Once there are no other issues, click “Confirm proposal, start implementation,” and then have the Agent begin the formal implementation stage.
Understanding the basic spec structure
smyw uses a tree to describe the interface before and after changes at the same time. Each node marks changes with change, while interactions and states are described by on, hidden, and states.
{
  "id": "reply",
  "type": "form",
  "label": "Reply to customer",
  "component": "<ReplyBox>",
  "change": "modified",
  "before": { "label": "Reply" },
  "children": [
    {
      "id": "reply-quick",
      "type": "select",
      "text": "Quick replies",
      "change": "removed"
    },
    {
      "id": "reply-polish",
      "type": "button",
      "label": "AI polish",
      "change": "added",
      "fn": "openDraftDrawer({ mode: \"polish\" })",
      "on": [
        { "action": "open", "target": "ai-drawer" }
      ]
    }
  ]
}
This example shows the reply form title changing from “Reply” to “Reply to customer,” the existing quick-reply control being removed, and a new button being added to open the AI drawer. component maps to the code component, while fn represents a related behavior or API placeholder.
For a complete field reference, see spec-format.md. For the Agent's execution rules, see SKILL.md.
Advanced Usage Tips
Review the UI, workflow, and backend together
Do not review only the page layout. For features involving APIs or data changes, also inspect the workflow swimlane and backend changes. The workflow swimlane compares changes before and after across the user, frontend, backend, database, and external services; locator entry points on each step can jump back to the corresponding UI element.
Use the toolbar to understand code impact
- Open “ƒ Functions” to view the behavior or API placeholder behind an element.
- Open “Components” to view the code component corresponding to a module.
- Open “Dim unchanged” to focus on the scope affected by the current request.
- Open “All connections” only when you need to review the complete trigger relationships.
Use presentation mode to verify state changes
Presentation mode is useful for more than previewing navigation; it also helps verify linked state changes. For example, a “Replace in reply box” button can insert a draft into the reply box and close the drawer. An annotation automatically records the page you were on, the content that was open, and the click history, helping the Agent reproduce the issue.
Keep IDs stable
Structural changes in feedback are located by node ID, so existing node IDs should remain stable across multiple iterations whenever possible. Do not change an ID arbitrarily unless the element itself has been deleted or its meaning has changed completely.
Pay attention to build validation
build.mjs checks for common issues such as duplicate IDs, modified nodes missing before, using “(unchanged)” instead of a real module, and overlays without triggers. When an error occurs, fix the spec first, then review the generated result.
Handle narrow windows and sandbox restrictions
In narrow windows such as the Agent side preview, the change list is collapsed into the “☰ Changes” button, while details float over the canvas. In a restricted sandbox, the browser may prevent saving progress or copying automatically; if copying fails, the page automatically selects the feedback content, after which you can press Ctrl or Command plus C.
Project Development and Testing
If you need to modify smyw itself, you can run the end-to-end tests or regenerate the README screenshots:
node tests/e2e.mjs
node tests/readme-shots.mjs
The tests require Node.js 18 or later and Google Chrome. If Chrome is not installed at the default path, specify it as follows:
CHROME=/path/to/chrome node tests/e2e.mjsThe project is licensed under the MIT License.
Summary
smyw changes the coding Agent's workflow from “understand the requirements and write code directly” to “read the code first, generate a spec, present an interactive prototype, collect structured feedback, and then begin implementation.” It is especially well suited to requests involving page layouts, overlays, state transitions, multi-page workflows, or frontend and backend APIs.
Start by trying the repository examples. Once you have confirmed that the Agent can read the skill, apply it to a real project. Change markers, presentation mode, direct editing, annotations, and versioned feedback can significantly reduce misunderstandings in requirements, allowing formal coding to begin from an already confirmed solution.