

You can build an AI avatar on your own computer that can listen, speak, move its lips, and converse with you—without relying on online AI tools or paying expensive subscription fees. By connecting speech recognition, a local large language model, voice synthesis, and lip synchronization, you can create a real-time interactive system that runs entirely on your local machine.
This article starts with hardware preparation and guides you through the complete deployment in a Windows + WSL2 environment. The final result is a web page displaying a custom avatar. You talk to the AI avatar through a microphone, and it responds using your cloned voice.
I. How the Complete System Works
This solution is not handled by a single model. Instead, it deploys multiple components:
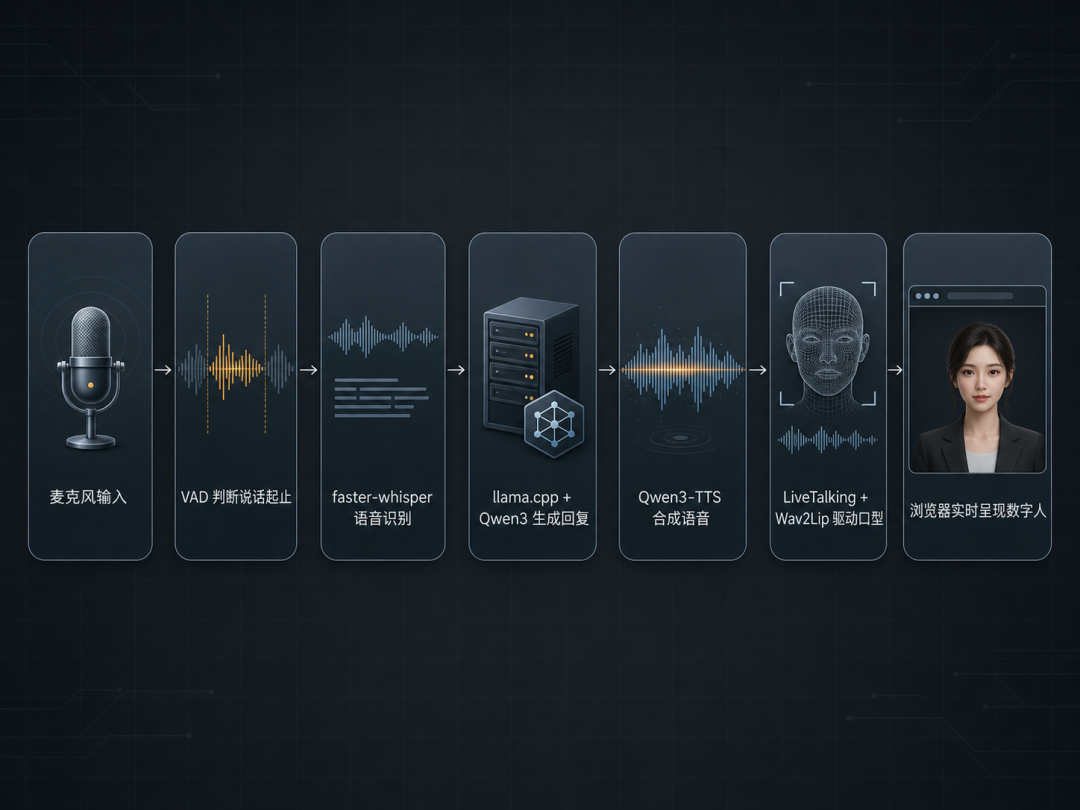
llama.cpp runs the local language model; faster-whisper converts the user's speech into text; Qwen3-TTS generates a spoken response based on reference audio; and LiveTalking together with Wav2Lip converts the audio into matching mouth movements.
II. Hardware Requirements and VRAM Budget
Minimum configuration:
NVIDIA GPU: 8GB VRAM
Memory: 16GB
Available storage: at least 60GB
System: Windows 10/11 with WSL2 support
Recommended configuration:
NVIDIA GPU: 16GB VRAM or more
Memory: 32GB or more
An SSD is recommended for storing models and WSL files
Using the Qwen3 14B quantized model as an example, VRAM usage is approximately:
Component | Approximate VRAM usage
Qwen3-14B Q4_K_M | Approximately 9GB
faster-whisper large-v3 | Approximately 3GB
Qwen3-TTS 1.7B | Approximately 4GB
Wav2Lip 256 | Approximately 1.3GB
Total | Approximately 17GB
A GPU with 24GB of VRAM will run this combination more comfortably. With 16GB of VRAM, you can switch to an 8B model and reduce the context length. With around 8GB, it is recommended to start with a 4B model and a medium-sized speech recognition model.
III. Configure WSL2 Networking and Memory
1. First, create a .wslconfig file in your Windows user directory:
C:\Users\YourUsername\.wslconfig2. Enter the following:
[wsl2]
memory=32GB
networkingMode=mirrored

[experimental]
hostAddressLoopback=true
You can adjust memory according to your actual RAM. Usually, allocating one-half to three-quarters of the physical memory is sufficient. hostAddressLoopback=true is especially important for WebRTC communication between Windows and WSL on the same computer. Without it, the later WebRTC connection will fail indefinitely, with no obvious error: the browser will show a JSON parsing error, and the ICE candidate list will be empty.
3. After making the change, run the following in PowerShell:
wsl --shutdownThe configuration will take effect after you re-enter WSL.
IV. Start the Local Large Language Model on Windows
1. Prepare llama.cpp
Download the Windows version of llama.cpp and extract it to a fixed directory, for example:
E:\llama.cppStable version download: https://pan.quark.cn/s/0073852e4042
2. Select a model based on available VRAM
VRAM range | Recommended model | Download address
16GB or more | Qwen3-14B-Instruct Q4_K_M | https://pan.quark.cn/s/f48c2144ac71
8–16GB | Qwen3-8B GGUF Q4_K_M | https://pan.quark.cn/s/78b8643f1be3
Below 8GB | Qwen3-4B GGUF | https://pan.quark.cn/s/fd588898ccbf
Put the downloaded .gguf file in:
E:\llama.cpp\models3. Start the inference service
Run the following in the Windows Command Prompt:
cd /d E:\llama.cpp
llama-server -m E:\llama.cpp\models\Qwen3-14B-Instruct-Q4_K_M.gguf ^
  -np 1 -c 8192 -fa on --temp 1.0 --top-p 0.95 ^
  --host 0.0.0.0 --port 8090
What the parameters do:
host 0.0.0.0: allows WSL to access the model service on Windows;
c 8192: sets the context length, which is sufficient for short conversations;
temp 1.0: makes responses less rigid;
port 8090: specifies the service port.
This Command Prompt window must remain running. If you are told that the port is occupied but a regular check does not show any process, check whether Hyper-V has reserved the port:
netsh interface ipv4 show excludedportrange protocol=tcpIf there is a conflict, the simplest solution is to change the port in both the model service and the calling script.
V. Create the Avatar Base Image and Avatar Video
1. First design an avatar image you like
The avatar image should not focus only on looking attractive. It also needs to leave room for the later web layout and lip generation. A reliable composition is:
Use a 16:9 aspect ratio;
Place the person in the right third of the frame;
Leave a large dark area of negative space on the left for the interactive orb and subtitles;
Keep the lips naturally closed, with no teeth visible;
Do not let the hands cover the mouth, chin, or facial contours;
Use relatively dim side lighting to reduce the unnatural look caused by slight blur around the mouth.
You can refer to the following prompt concept and replace the person, clothing, and setting as needed:
Cinematic low-light side-profile portrait of an adult woman seated on the right side of the frame, soft rim light,
large dark negative space on the left, natural expression, closed lips, locked camera,
realistic skin texture, 16:9 landscape composition.
Negative prompts can include: open mouth, visible teeth, person centered, bright cluttered background, hand covering the mouth, text, watermark, plastic skin, cartoon style.
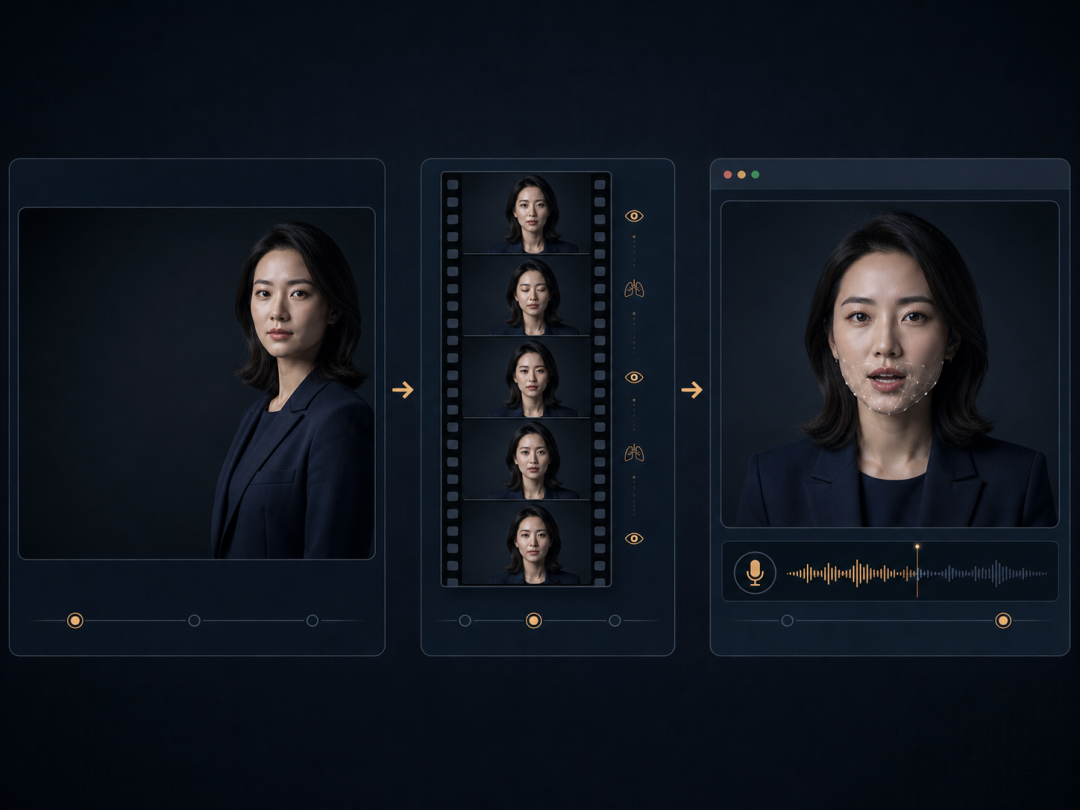
2. Generate a 5-second avatar video with ComfyUI + Wan2.2
Download and install ComfyUI. After opening it, select the Wan2.2 image-to-video workflow and use the base image as the first frame. For your first attempt, the following conservative settings are recommended:
Parameter | Recommended value
Resolution | Match the base image aspect ratio; the original tutorial example is 704 × 896
Duration | 5 seconds
Frame rate | 25 fps
Prompt Enhance | Off
ComfyUI download: https://pan.quark.cn/s/bb9d21f1e724
Describe only the action in the prompt, without describing the person's appearance again. For example:
The person remains in the original position, with only slight breathing, slowly blinks once, makes a very small natural head movement, then returns to the starting pose,
lips remain closed throughout, locked camera, no zooming, panning, or tilting.
Export the file and name it: idle.mp4
Because the actual speaking lip movements will be generated in real time by Wav2Lip, there is no need to create additional videos such as “speaking” or “listening.”
Here are some common mistakes:
Do not enable prompt enhancement. Turn off prompt_enhance to prevent the model from redesigning the person or scene;
The output aspect ratio must match that of the input image. If you use a 16:9 landscape base image, switch to a landscape size supported by the workflow to avoid stretching or cropping the person;
Write only actions in the prompt. Repeatedly describing the appearance can instead make the person drift;
A 5-second video is sufficient for a looping idle animation. Extending the video unnecessarily makes repetition or deformation more likely.
VI. Record Reference Audio (Voice Cloning)
Qwen3-TTS imitates the voice and speaking style based on reference audio. It is recommended to record 5–15 seconds of audio with the following requirements:
Only one person is speaking;
A quiet environment with no music or noticeable reverberation;
A natural speaking pace and an emotion consistent with the style you want to clone;
Save a completely accurate verbatim transcript.
After recording, export the file ( wav or mp3 format) and place it in the AI folder on the desktop. Name the file: ref.wav. Write down exactly what was said in the recording, because you will need to enter it in the configuration later. Note that emotion will also be cloned, so use the tone you want during recording.
For the reference audio, download the “one-click deployment package.” These scripts install the voice conversation environment, start the services, and handle audio-video synchronization. Because the scripts may change with project versions, it is best to quickly check the download addresses, ports, and model names before use. The package includes:
File | Purpose
install-voice.sh | One-click installation of the voice conversation component
start-voice.sh | Start / stop / log management for the voice service
start-livetalking.sh | Start / stop the lip-sync service
avatar-sync.js | Audio forwarding + avatar background layer
wav2lip256.pth | Lip-sync model weights
wav2lip256_avatar1.tar.gz | Official sample avatar (for verifying the pipeline)
One-click deployment package: https://pan.quark.cn/s/d4fc5bfc88eb
VII. Organize the Files
Finally, place the 5-second avatar video file idle.mp4 and the audio file ref.wav` together in the AI folder on the desktop. The final directory structure is:
C:\Users\YourUsername\Desktop\AI\
├── install-voice.sh
├── start-voice.sh
├── start-livetalking.sh
├── avatar-sync.js
├── wav2lip256.pth
├── wav2lip256_avatar1.tar.gz
├── idle.mp4
└── ref.wav
VIII. Install WSL2 (Ubuntu 24.04 with GPU Support)
Open PowerShell as administrator:
wsl --update
wsl --install -d Ubuntu-24.04
After installation is complete, restart the computer so that the .wslconfig from the first step takes effect. After restarting, open the Ubuntu terminal, set a username and password, and verify GPU passthrough:
nvidia-smiIf you can see the GPU model and driver information, GPU passthrough is working correctly.
Do not install the GPU driver again inside WSL. The GPU driver should be installed only in Windows. WSL uses the CUDA passthrough provided by the host; installing the GPU driver again in WSL will overwrite libcuda.so and make the GPU unavailable.
IX. Copy the Installation Package into WSL
In the Ubuntu terminal, replace the path with your own Windows username:
#Copy files (replace the path with your own username):
mkdir -p ~/setup
cp -r "/mnt/c/Users/YourUsername/Desktop/AI/." ~/setup/
cd ~/setup
ls -la

#Convert line endings:
sudo apt update
sudo apt install -y dos2unix
dos2unix *.sh

#Add execute permissions:
chmod +x *.sh
Why convert line endings: Windows text files commonly use CRLF line endings. Without conversion, you may encounter bash^M or bad interpreter errors, which is where many people get stuck.
Running many Python files directly in /mnt/c is usually slower and can also cause permission issues. Copying them to the Linux home directory is more reliable.
10. Install and Test the Voice Conversation Module
1. Run the installation script
cd ~/setup
./install-voice.sh
The installation creates a Python environment and prepares voice activity detection, faster-whisper, Qwen3-TTS, and frontend components. Depending on network and disk speed, it may take over ten minutes.
2. Standardize the reference audio format
ffmpeg -i ~/setup/ref.wav -ac 1 -ar 16000 -c:a pcm_s16le ~/s2s/ref.wav

# Confirm the format: it must be pcm_s16le / 16000 / 1 channel:
ffprobe -v error \
  -show_entries stream=sample_rate,channels,codec_name \
  -show_entries format=duration \
  -of default=nw=1 ~/s2s/ref.wav
The results should meet these requirements:
Codec: pcm_s16le
Sample rate: 16000
Channels: mono
3. Enter the reference audio transcript
Replace the text below with the words actually spoken in the recording:
sed -i 's|^REF_TEXT=.*|REF_TEXT="Enter a verbatim transcript that exactly matches the recording here"|' ~/setup/start-voice.sh
grep -n "^REF_TEXT=" ~/setup/start-voice.sh
Omitted words, typos, or excessive punctuation differences in the transcript will reduce cloning quality.
4. First launch
cd ~/setup
./start-voice.sh
Then open the following address in a Windows browser:
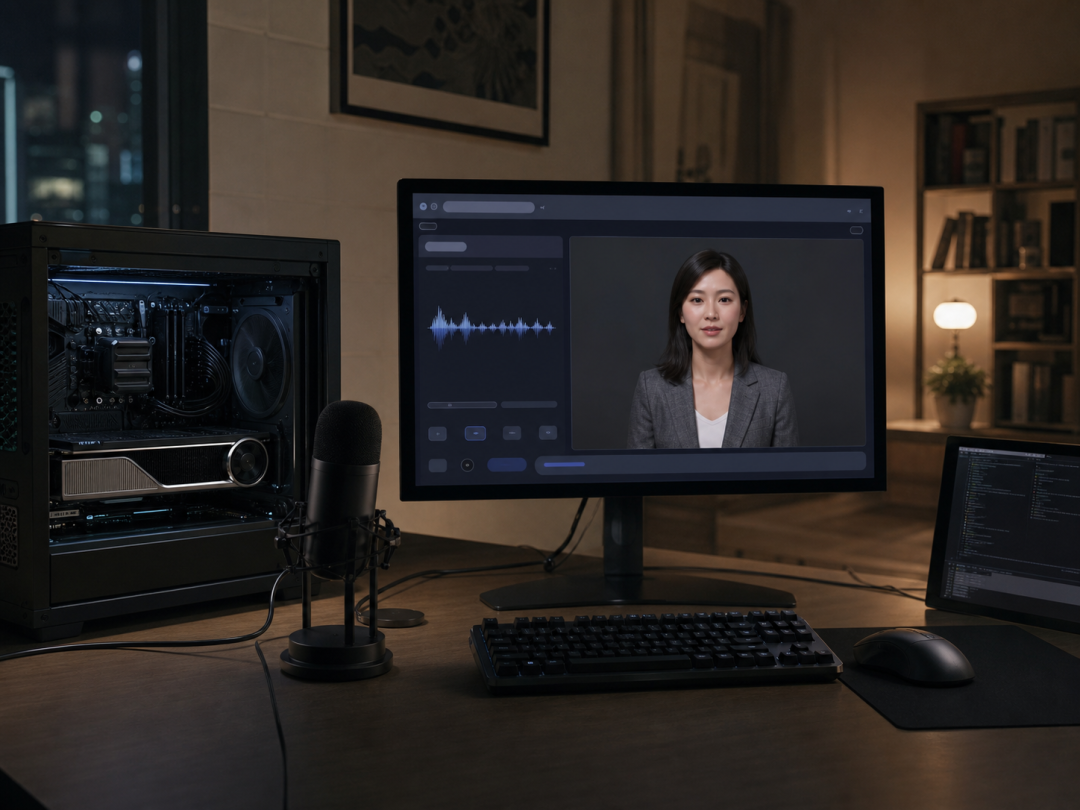
http://localhost:7860/Allow the browser to use the microphone, then click the interaction button on the page to test it. The first time, open Settings and move NOISE GATE all the way to the left or turn it off; otherwise, normal speech may also be filtered out as background noise.
11. Install LiveTalking (lip sync) and Wav2Lip
Open a new Ubuntu terminal, enter WSL, and run the following commands in order:
mkdir -p ~/livetalking
cd ~/livetalking
git clone https://github.com/lipku/LiveTalking.git
cd LiveTalking

uv venv --python 3.10 .venv-lt
source .venv-lt/bin/activate

uv pip install torch==2.5.0 torchvision==0.20.0 torchaudio==2.5.0 \
  --index-url https://download.pytorch.org/whl/cu124

uv pip install -r requirements.txt
sudo apt install -y ffmpeg libgl1 libglib2.0-0
If uv is not installed on your system, follow the official uv installation instructions first, then run the commands above again.
Place the lip-sync model and default digital human:
cd ~/livetalking/LiveTalking

# Rename it to: wav2lip.pth
cp ~/setup/wav2lip256.pth models/wav2lip.pth

# Official sample avatar
tar -xzf ~/setup/wav2lip256_avatar1.tar.gz -C data/avatars/

# Confirm
ls -lh models/ && ls data/avatars/
Note: although the source file is called wav2lip256.pth, it must be named wav2lip.pth after copying because the project looks for weights under this filename by default.
Test the official sample avatar first:
cd ~/livetalking/LiveTalking
source .venv-lt/bin/activate

python app.py --transport webrtc --model wav2lip \
  --avatar_id wav2lip256_avatar1 \
  --stun 'stun:stun.l.google.com:19302'
Open the following address in your browser:
http://localhost:8010/index.htmlAfter connecting successfully, send a piece of Chinese text. This stage is complete only when sound, character movement, and matching lip movements appear at the same time.
The inferfps and finalfps values in the terminal log can be used to monitor real-time performance. Ideally, both should reach around 25 or higher. If inferfps is clearly too low, reduce the model load or switch to a lighter configuration.
Online tutorials often recommend MuseTalk. Although its image quality is better, the visual requirements for this AI avatar are not high, while its VRAM usage is about 1.3GB. For dark lighting, side profiles, and scenes where the person occupies a relatively small portion of the frame, we can achieve acceptable results at lower cost, whereas MuseTalk uses 12G of VRAM. A fully local deployment also does not require STUN, but do not pass an empty string; otherwise, WebRTC may fail to start because of an invalid STUN address format.
12. Convert a video into your own digital human avatar
While LiveTalking is running, open:
http://localhost:8010/avatar.htmlSubmit the generation task as follows:
Algorithm: Wav2Lip
Avatar ID: wav2lip256_myavatar (retain the wav2lip256_ prefix)
Video file: the previously generated idle.mp4
After the status changes to COMPLETED, start your own avatar:
cd ~/setup
AVATAR_ID=wav2lip256_myavatar ./start-livetalking.sh
To start it by default in the future, modify the Avatar ID in the script:
sed -i 's/wav2lip256_lingdu/wav2lip256_myavatar/' ~/setup/start-livetalking.shIf obvious tearing appears around the mouth after generation, first check whether the hands, hair, or collar frequently cover the mouth and chin in the idle video, rather than immediately switching models.
13. Start the complete system in the correct order
The complete system requires three terminal windows.
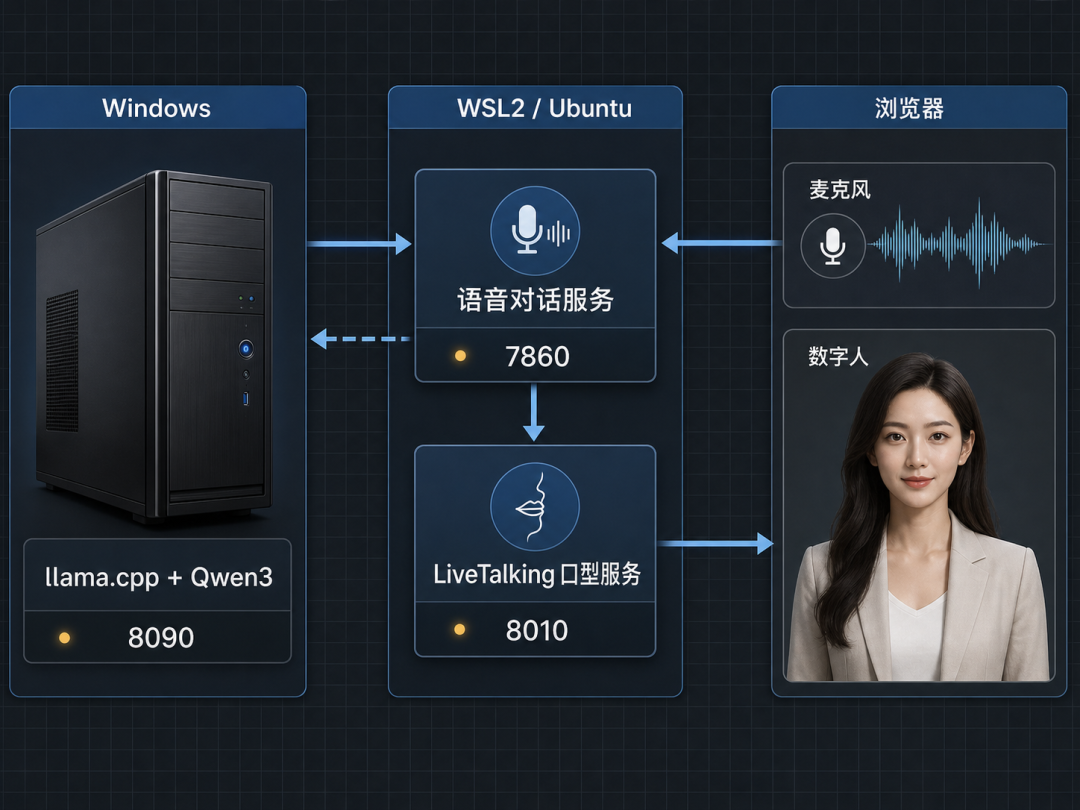
First window: Windows local large language model
cd /d E:\llama.cpp
llama-server -m E:\llama.cpp\models\Qwen3-14B-Instruct-Q4_K_M.gguf ^
  -np 1 -c 8192 -fa on --temp 1.0 --top-p 0.95 ^
  --host 0.0.0.0 --port 8090
Second window: WSL lip-sync service
cd ~/setup
./start-livetalking.sh
Third window: WSL voice service
cd ~/setup
./start-voice.sh
Finally, open http://localhost:7860/ and press Ctrl + F5 for a hard refresh if necessary. First click the page to establish the avatar connection, then click the voice interaction button to start speaking.
To stop the services, run:
./start-voice.sh stop
./start-livetalking.sh stop
In the Windows llama.cpp window, simply press Ctrl + C to stop it.
14. Set a natural persona with low latency
Enter the persona under Settings → INSTRUCTIONS on the webpage. Do not merely pile up adjectives such as “gentle, lively, and understanding.” It is better to also provide several short dialogue examples so the model can learn the response rhythm.
You can use constraints like these:
You are a natural and friendly virtual companion. Speak conversationally and answer with only two or three sentences each time.
Do not use Markdown, lists, numbering, emojis, or descriptions of stage actions.
Do not repeat the user's question; respond directly. When information is uncertain, say so honestly.

Example:
User: I'm a little tired today.
Assistant: Then don't push yourself to operate at full capacity. Have some water and rest for ten minutes, and we'll handle things gradually.
Short replies not only feel more like real conversation, but also significantly reduce the time needed to synthesize complete speech. Disabling Markdown and emojis prevents TTS from reading symbols or formatting marks aloud. /no_think disables unnecessary long reasoning output and further reduces first-sentence latency.
15. Reduce talking over the user and false interruptions
The hardest part to tune in a real-time voice system is often not the model, but “when to decide that the user has finished speaking.” Chinese speech often includes pauses in the middle of a sentence, and if the silence detection period is too short, the system will frequently talk over the user.
Try the following parameters in ~/setup/start-voice.sh:
MIN_SILENCE_MS=1200
VAD_THRESH=0.6
MIN_SPEECH_MS=500
SPEECH_PAD_MS=300
Parameter meanings:
MIN_SILENCE_MS: How long silence must last before a sentence is considered finished; start with 1200ms, and lower it to 900ms if the response feels slow;
VAD_THRESH: Voice activity threshold; raise it to 0.7 in noisy environments;
MIN_SPEECH_MS: Filters out sounds that are too short;
SPEECH_PAD_MS: Keeps a small buffer before and after speech to reduce clipped words.
Check the log:
tail -f ~/s2s/logs/s2s.log | grep -E "soft-ended|discard"If the log behavior remains completely unchanged after modifying the parameters, the parameters are usually valid but the service was not actually restarted.
16. Reduce the load when VRAM is insufficient
Try the following in order of expected benefit:
Replace Qwen3-14B with Qwen3-8B to save about 3GB;
Switch to Qwen3-4B to save about 6GB;
Change the speech recognition model to `medium` to save about 1.5GB;
Reduce the llama.cpp context from `-c 8192` to `-c 4096` to save about 1GB more;
Keep Wav2Lip instead of switching to a heavier lip-sync model when VRAM is tight.
Each round of voice chat usually contains only two or three sentences. The difference in “listening experience” between 14B and 8B may not outweigh the difference in experience caused by waiting time. When VRAM is limited, prioritize stability and low latency.
17. Common troubleshooting reference
Issue | Cause and solution
bad interpreter or ^M appears | The script uses Windows line endings. Run `dos2unix *.sh
WebRTC cannot connect | Check that `hostAddressLoopback=true` is set in `.wslconfig`, then run `wsl --shutdown`
The webpage reports a JSON parsing failure | The backend often returned a 500 error. Check the actual error in the terminal where the service was started
malformed/uri:invalid scheme | The STUN address is empty or incorrectly formatted. Pass a valid `stun:` address
The webpage opens, but speaking produces no response | Disable or lower NOISE GATE, and confirm that the browser has microphone permission
The digital human frequently interrupts | Increase `MIN_SILENCE_MS`; 1200ms is a recommended starting point
The response does not match the question | Fix incorrect sentence segmentation first, and confirm that conflicting real-time transcription processes are not enabled at the same time
The voice differs significantly each time | Check whether the TTS Base model is being used, and verify the reference audio and transcript
The voice sounds pitch-shifted | Check the sample rate setting in `avatar-sync.js`; it should usually match 16000Hz audio
Port binding fails, but no process can be found | Check the Hyper-V reserved port range and switch to a port that is not reserved
The GPU is fully utilized, but there is no progress for a long time | GPU memory may be falling back to system memory. Use a smaller model, or check the CUDA system memory fallback policy in the NVIDIA Control Panel
There is no microphone access when using a LAN IP | Browsers usually require localhost or HTTPS to allow microphone access
The service stops working after the computer wakes from sleep | Run `wsl --shutdown`, then restart the three services
Startup reports that a port is already in use | Run the two `stop` commands first, confirm that the old processes have ended, and then restart
18. Optional: Create a one-click startup script
After confirming that all three services can run independently and reliably, create start-ai-avatar.bat in Windows:
@echo off
start "llama-server" cmd /k "cd /d E:\llama.cpp && llama-server -m E:\llama.cpp\models\Qwen3-14B-Instruct-Q4_K_M.gguf -np 1 -c 8192 -fa on --temp 1.0 --host 0.0.0.0 --port 8090"
timeout /t 25

start "livetalking" wsl -d Ubuntu-24.04 -- bash -lc "cd ~/setup && ./start-livetalking.sh"
timeout /t 30

start "voice" wsl -d Ubuntu-24.04 -- bash -lc "cd ~/setup && ./start-voice.sh"
timeout /t 10

start http://localhost:7860/
Adjust the wait times according to your computer. During the first deployment, do not rely directly on the batch script; otherwise, it will be difficult to determine which service failed when a step goes wrong.
19. Security concerns when accessing from a phone or exposing the service to the public internet
Browser microphone access is a sensitive permission. When opening the webpage using a regular LAN IP, the browser may refuse authorization because the page is not a secure context. Technically, tools such as Cloudflare Tunnel can map the local page to an HTTPS address, for example:
cloudflared tunnel --url http://localhost:7860However, this also means that the local service may be accessible from the internet. Do not publicly share temporary addresses without authentication, and especially do not directly expose services containing private voices, conversation records, or camera footage. When remote access is needed, add access control at a minimum, and close the tunnel promptly after use.
20. How to determine whether the deployment has truly succeeded
Do not use “the webpage opens” as the completion criterion. It is recommended to verify the deployment in the following order:
1. The llama.cpp port 8090 can generate normal Chinese responses;
2. The voice webpage can recognize microphone input and return synthesized speech;
3. The LiveTalking demo character can speak and generate matching lip movements;
4. The custom standby video can be successfully converted into an Avatar;
5. After the three services are connected, the wait for the first sentence is about 1–2 seconds, with no frequent interruptions during continuous conversation;
6. During extended operation, GPU memory does not continue to increase, and the service restart and stop commands work correctly.
The latency of a single response usually comes from several stages added together: speech recognition, the language model's first token, speech synthesis, lip-sync inference, and buffering while waiting for the complete audio. To optimize the experience, first use the logs to determine which stage is slowest instead of blindly replacing every model.
Conclusion:
The truly interesting part of this solution is not merely “making a photograph speak,” but connecting several local AI modules into a complete real-time interaction pipeline. It can serve as a virtual companion, or be adapted into an exhibition guide, desktop voice assistant, livestream digital human, or character prototype.
During the first deployment, the most reliable strategy is to verify each stage in sequence: run the language model first, then test the voice, next check the lip movements, and only then switch to the custom character. As long as every step has a clear success criterion, even a complex system can be broken down into a set of small, diagnosable, reproducible problems.
One final reminder: digital human appearances and voices may both involve personal rights. Before using them for public display or commercial purposes, be sure to obtain authorization from the rights holders of the materials, and clearly disclose that they are being used in an AI system to interact and converse with people.